Chef to OpsWorks Workshop Part 2 - Hands on OpsWorks
Objective
In this workshop, we are going move the cookbook we developed in part 1 into OpsWorks environment.
AWS OpsWorks Stacks Terminology
Stacks
The stack is the core AWS OpsWorks Stacks component. It is basically a container for AWS resources—Amazon EC2 instances, Amazon RDS database instances, and so on—that have a common purpose and should be logically managed together. The stack helps you manage these resources as a group and also defines some default configuration settings, such as the instances’ operating system and AWS region. If you want to isolate some stack components from direct user interaction, you can run the stack in a VPC.
Layers
A layer represents a set of Amazon EC2 instances that serve a particular purpose, such as serving applications or hosting a database server. A stack is made of one or more layers.
For all stacks, AWS OpsWorks Stacks includes service layers, which represent the following AWS services.
- Amazon Relational Database Service
- Elastic Load Balancing
- Amazon EC2 Container Service
Layers give you complete control over which packages are installed, how they are configured, how applications are deployed, and more.
Lifecycle Events
Layers depend on Chef recipes to handle tasks such as installing packages on instances, deploying apps, running scripts, and so on. One of the key AWS OpsWorks Stacks features is a set of lifecycle events—Setup, Configure, Deploy, Undeploy, and Shutdown—which automatically run a specified set of recipes at the appropriate time on each instance.
Instances
An instance represents a single computing resource, such as an Amazon EC2 instance.
Apps
You store applications and related files in a repository, such as an Amazon S3 bucket. Each application is represented by an app, which specifies the application type and contains the information that is needed to deploy the application from the repository to your instances, such as the repository URL and password. When you deploy an app, AWS OpsWorks Stacks triggers a Deploy event, which runs the Deploy recipes on the stack’s instances.
Moving from Chef to OpsWorks
Preparation for OpsWorks Stack
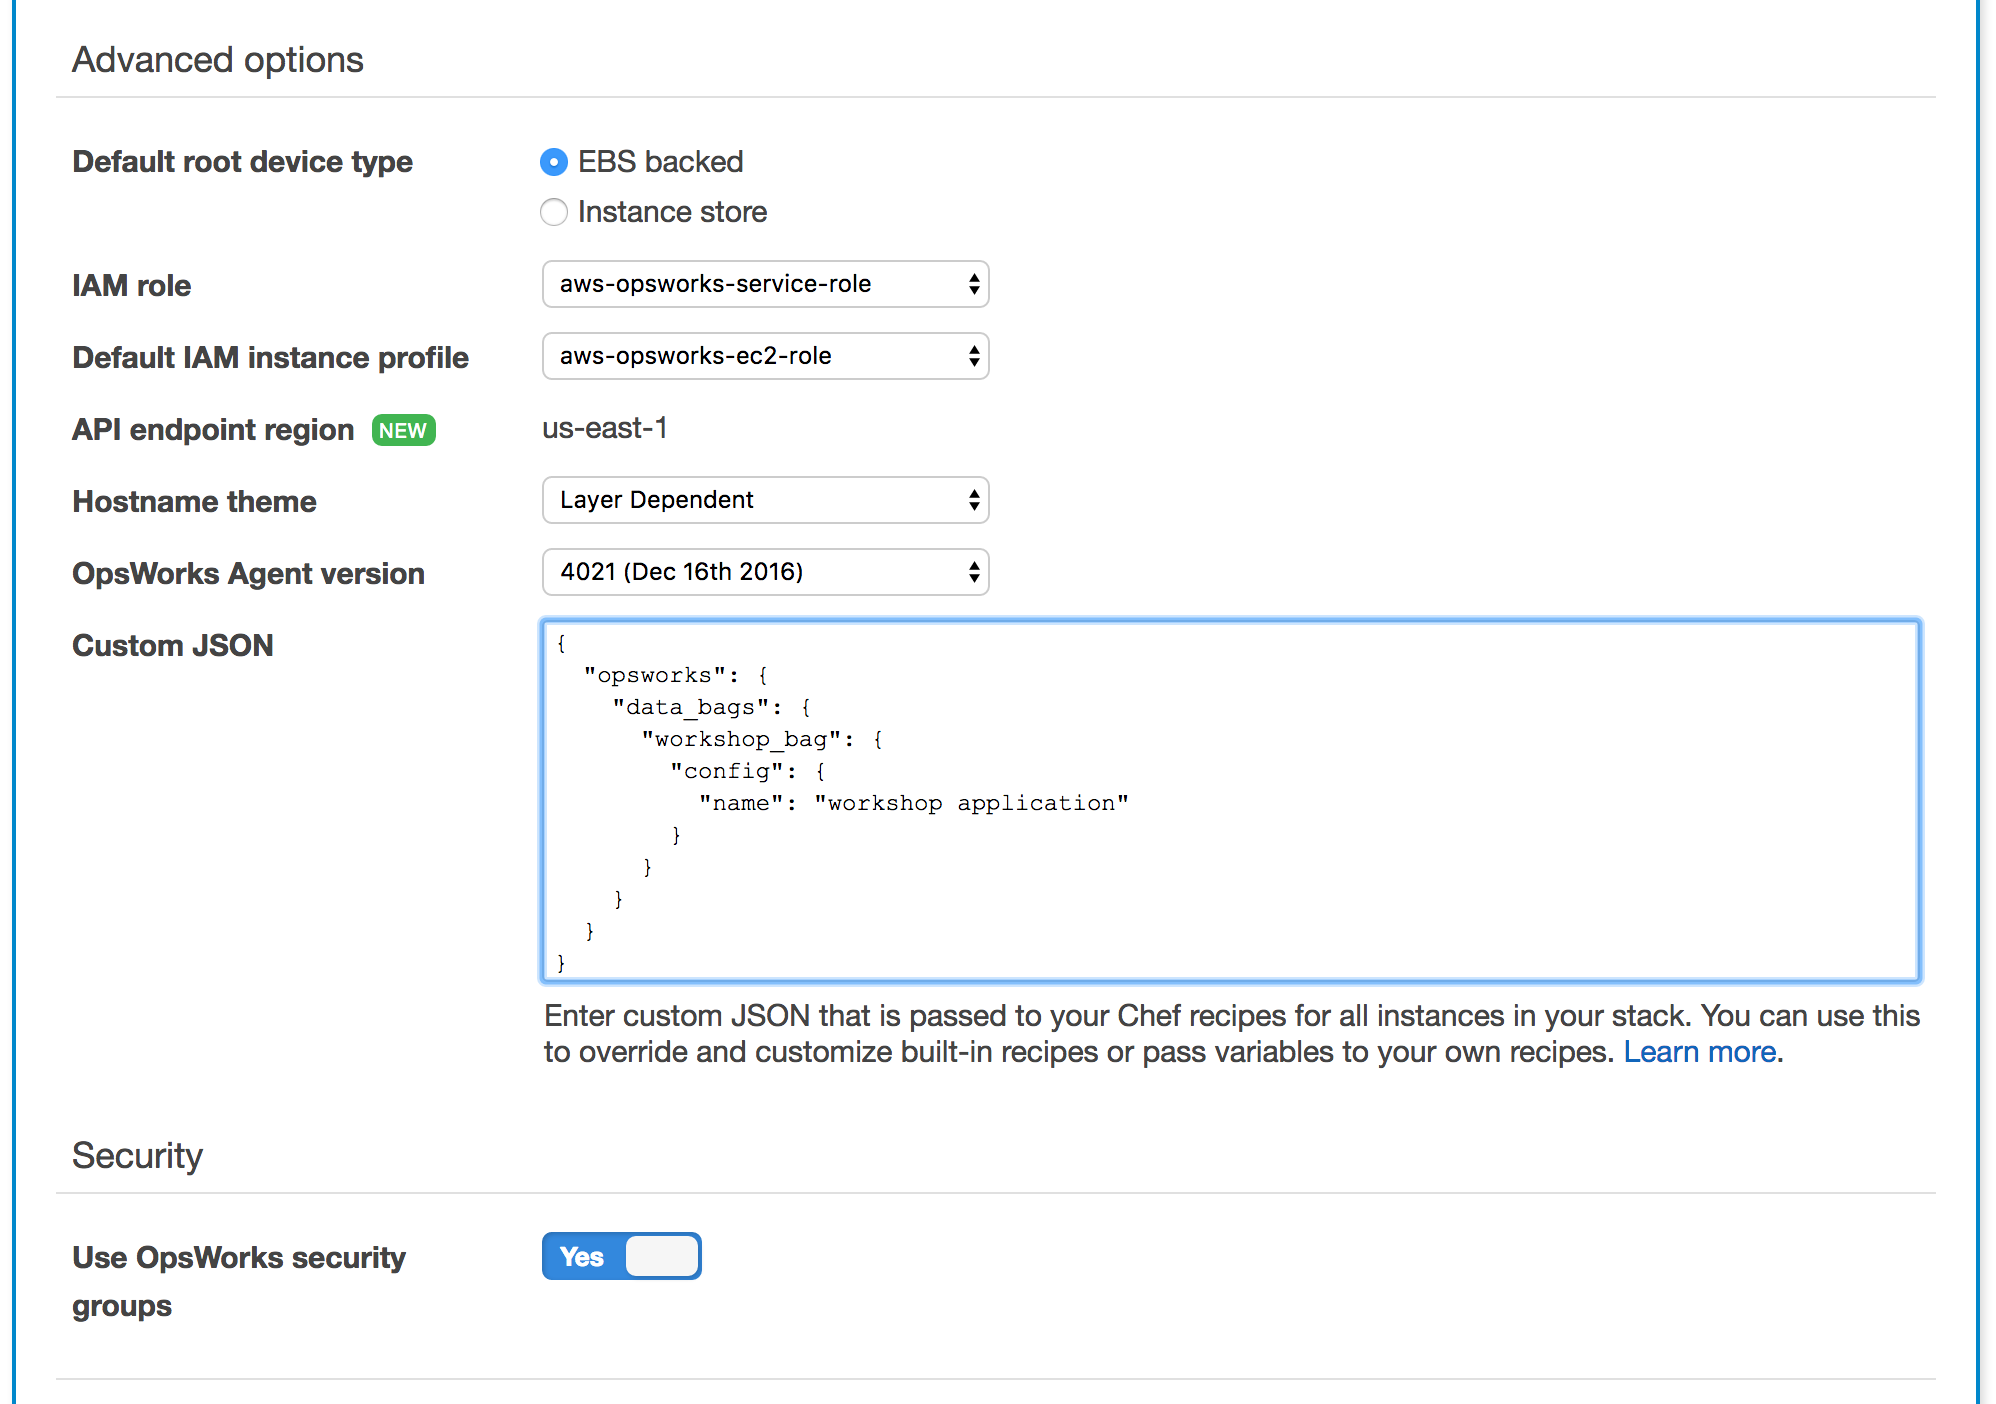
OpsWorks accepts data bag data in a custom JSON. Details here
Below is the JSON we will pass to OpsWorks.
{
  "opsworks": {
    "data_bags": {
      "workshop_bag": {
        "config": {
          "name": "workshop application"
        }
      }
    }
  }
}
With the command below, we will create a package of the cookbook and upload to an S3 bucket. (oz-opsworks is the name of the bucket in this workshop)
$ berks package workshop-cookbook.tar.gz; aws s3 cp workshop-cookbook.tar.gz s3://oz-opsworks/workshop-cookbook.tar.gz
Create an Elastic Load Balancer
Create ELB named workshop-elb on port 80.
$ aws elb create-load-balancer --load-balancer-name workshop-elb \
--listeners "Protocol=HTTP,LoadBalancerPort=80,InstanceProtocol=HTTP,InstancePort=80" \
--subnets subnet-897032d0 --security-groups sg-8604b7fa --region=us-east-1
If successful, you will get the DNS name as response.
{
"DNSName": "workshop-elb-1154144597.us-east-1.elb.amazonaws.com"
}
Create the health check.
$ aws elb configure-health-check --load-balancer-name workshop-elb --health-check Target=HTTP:80/hello.html,Interval=30,UnhealthyThreshold=2,HealthyThreshold=2,Timeout=3 --region=us-east-1
Response.
{
    "HealthCheck": {
        "HealthyThreshold": 2,
        "Interval": 30,
        "Target": "HTTP:80/hello.html",
        "Timeout": 3,
        "UnhealthyThreshold": 2
    }
}
Create the Stack
Go to OpsWork console and click on Chef 12 Stack. Give a name (workshop) to your stack. Choose the region, VPC as you want. Choose Linux and latest Amazon AMI, the access key you want to use. In the Repository URL I entered https://s3.amazonaws.com/oz-opsworks/workshop-cookbook.tar.gz. You will have to enter the correct URL for your tar.gz file. You can find the URL by checking the properties of the file on AWS S3 Console.
As seen below check yes on Use custom Chef cookbooks and provide S3 information. This is where OpsWorks will look for the cookbook.
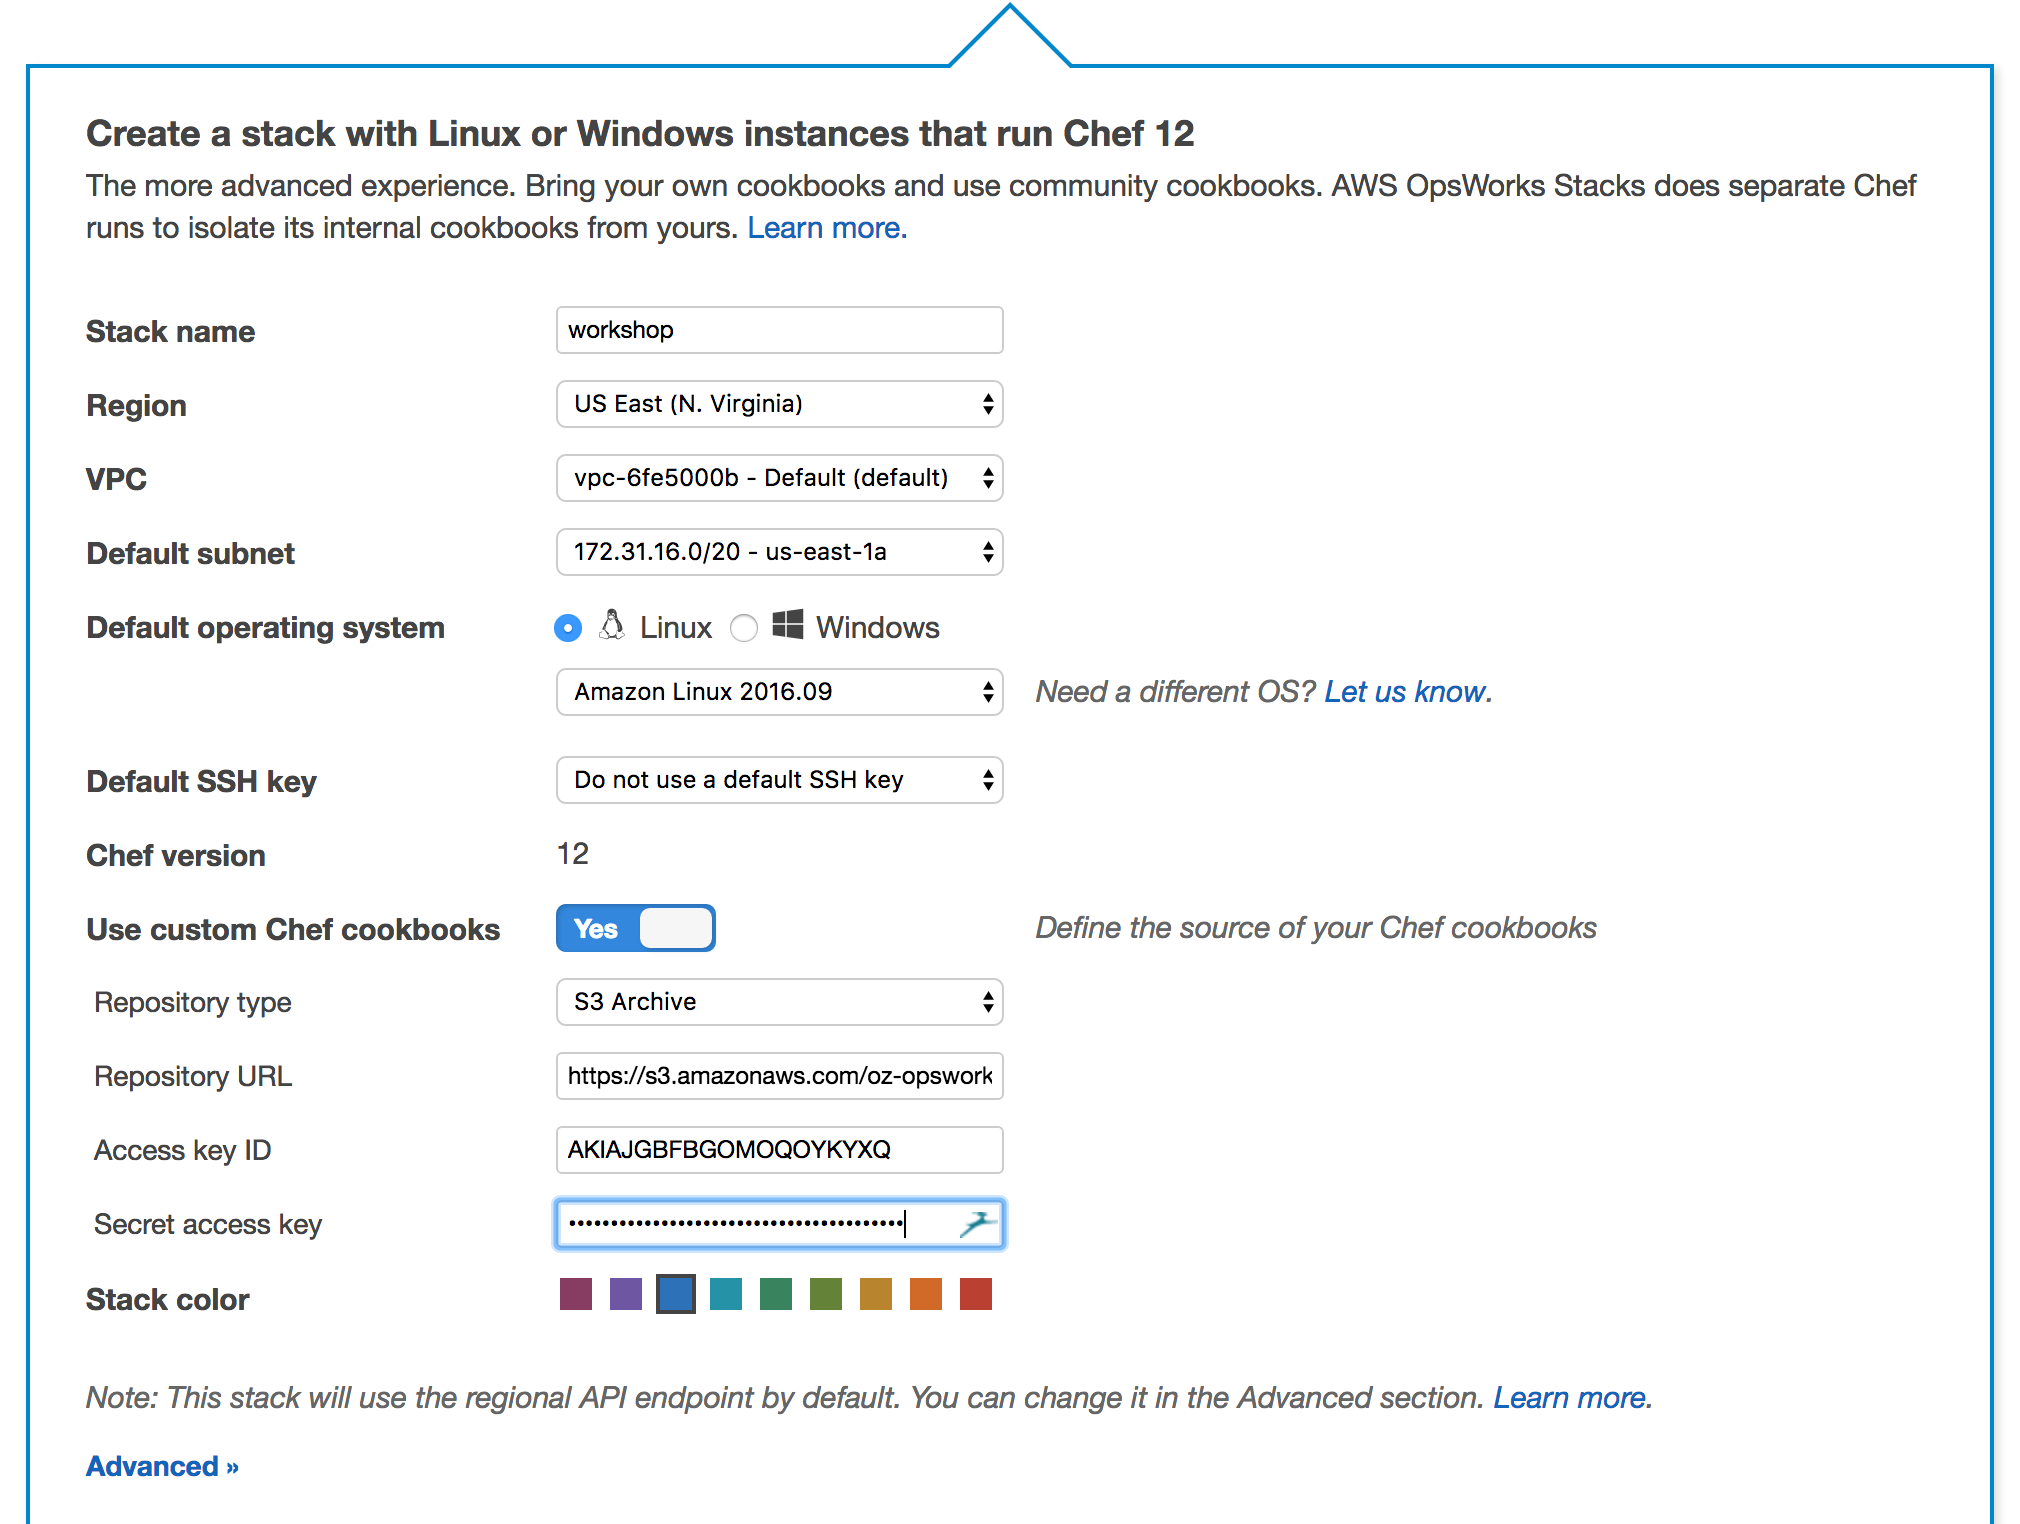
In the Advanced Section make the selections as seen before. Remember the JSON we mentioned earlier, paste that into Custom JSON.
Click Add Stack.
At this point we have a stack and we will create a Layer for Web Service.
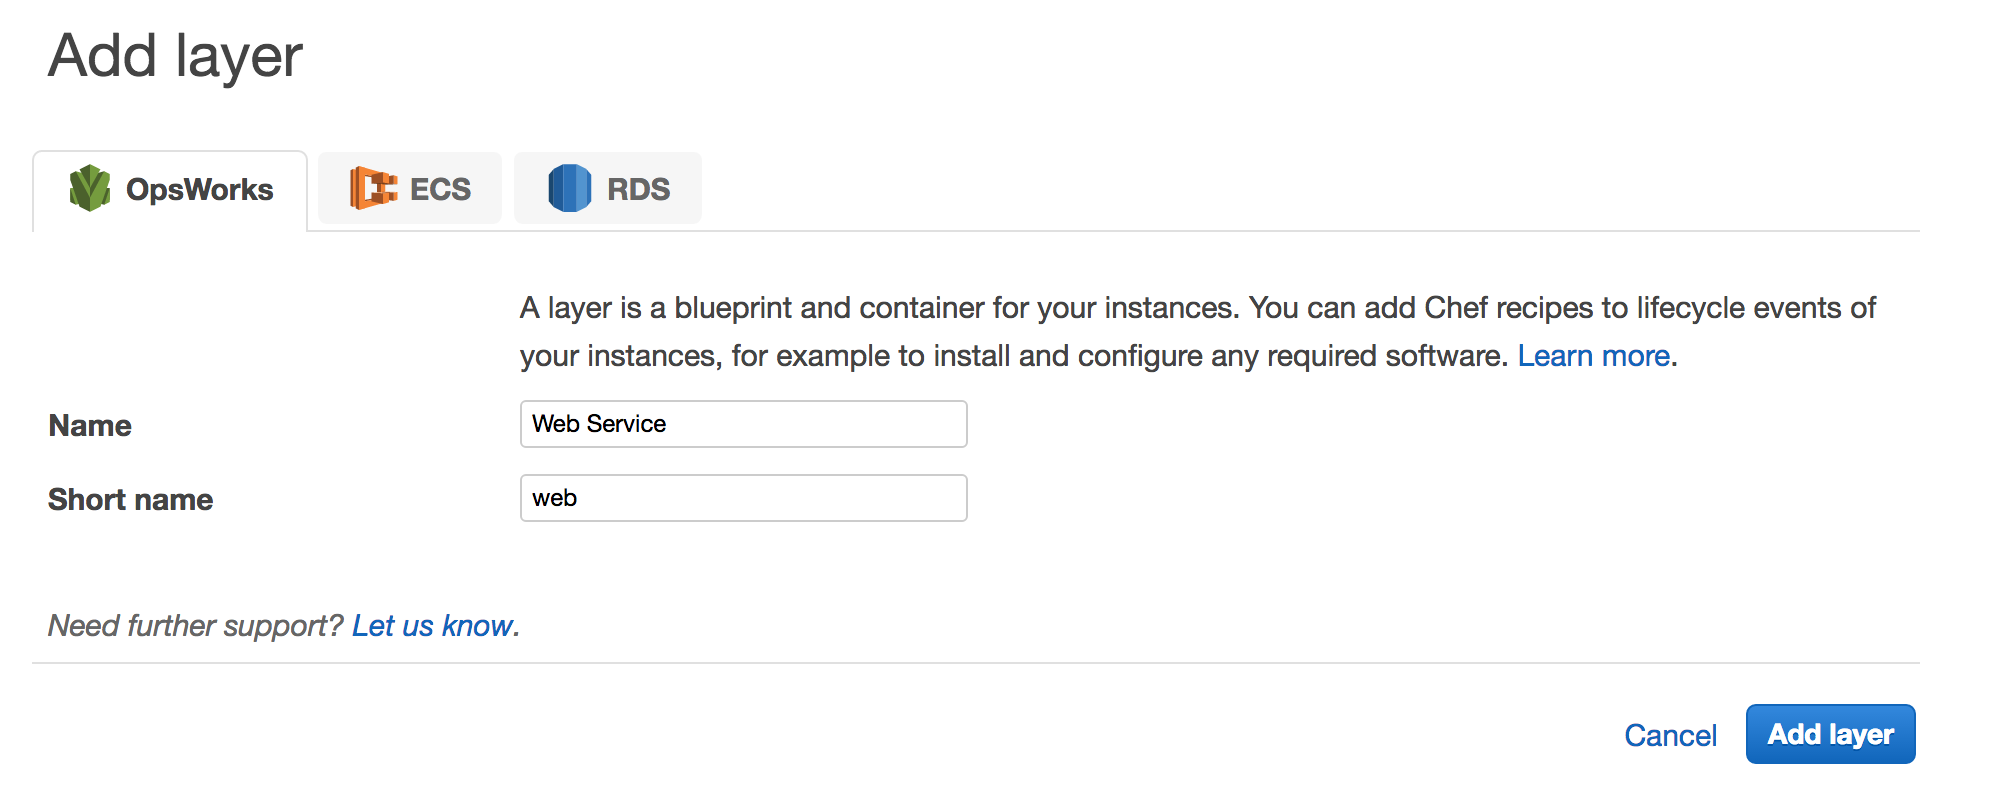
Create the Layer
On the following page, click Add a Layer. Give a long and a short name to the layer and click Add Layer.
On the next page, click on Network.

Choose the ELB you created earlier and click Save.
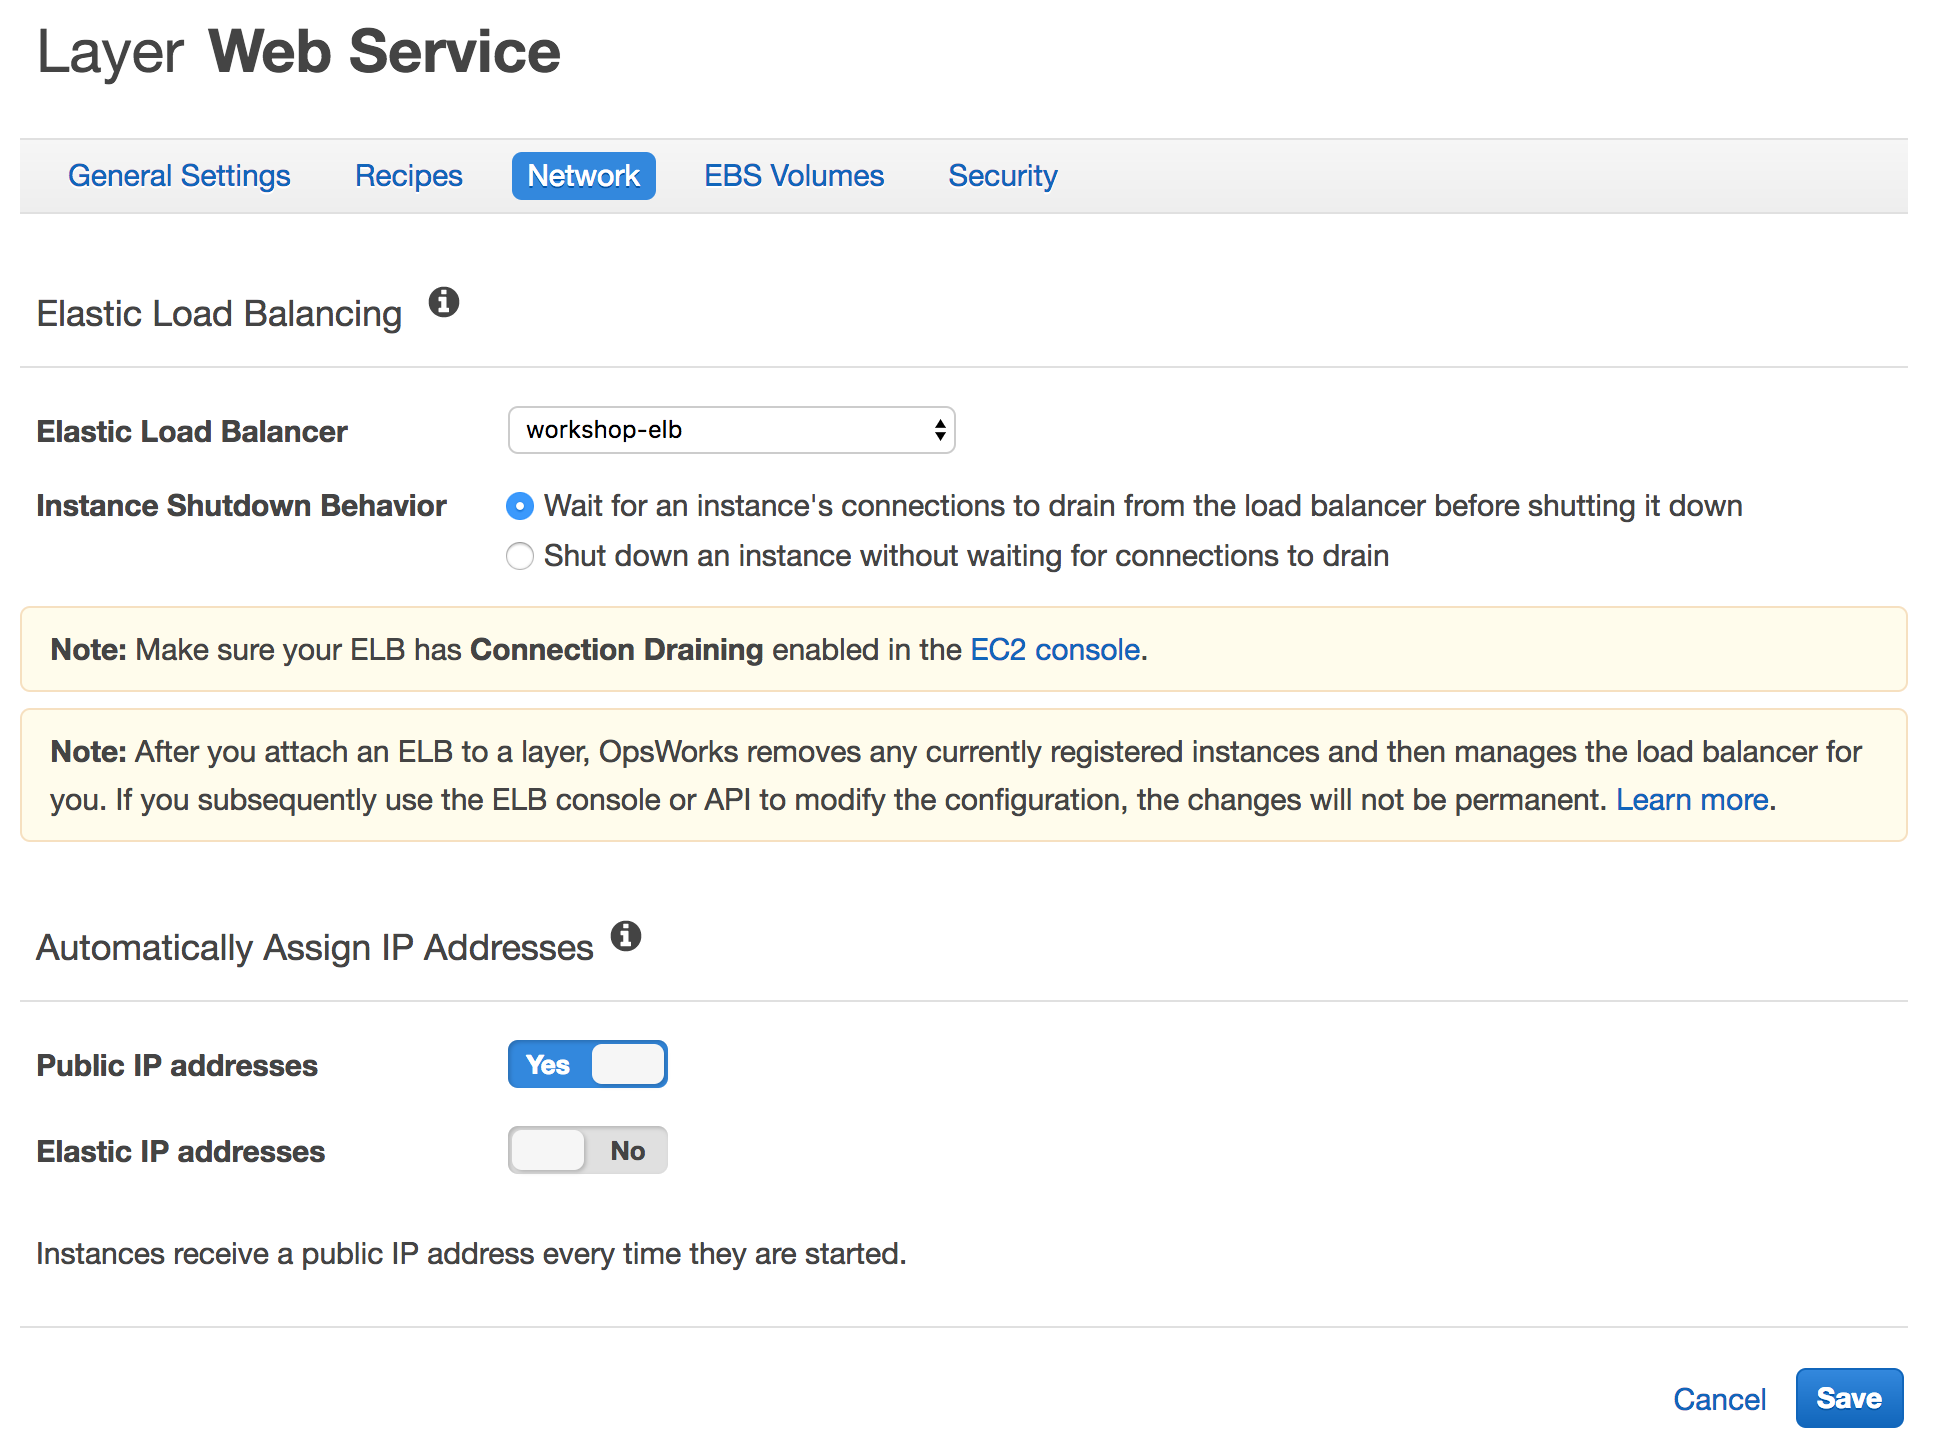
Don’t switch to another tab before clicking
Save.
Now we have associated an ELB with our layer and each instance we will create under this layer will automatically join to ELB.
Click Security and choose chef-workshop-sg which has port 80 allowed for ingress.

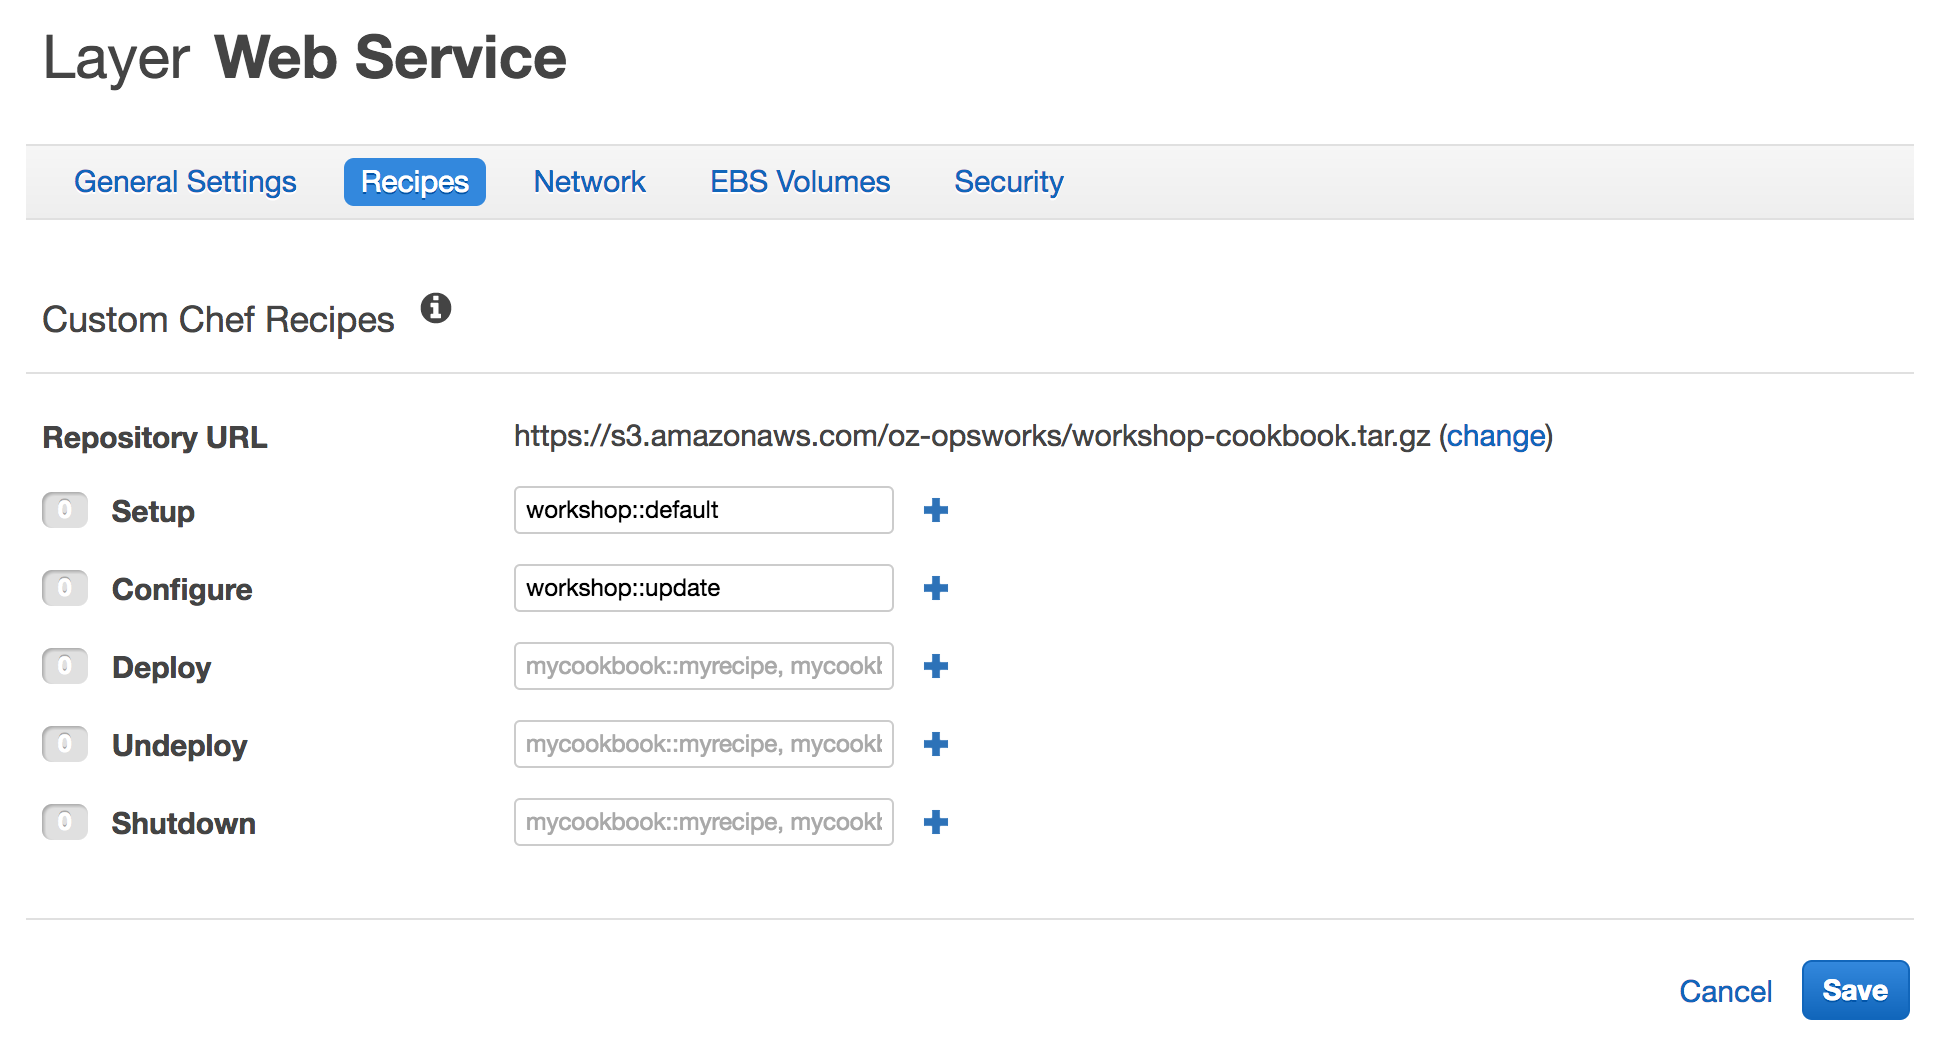
Click Recipes and enter the recipe names and click Save. It will look like below.
Use OpsWorks Data Bags
Before going forward and creating instances, we will modify our workshop cookbook in order to use aws_opsworks_instance data bag which provides information about the instances in the stack.(More here)
We will make changes to web_server recipe and hello.html template in order to find all EC2 instances in the layer using OpsWorks aws_opsworks_instance data bag. These data bags are automatically populated by OpsWorks and are especially useful in dynamic environments where you add/remove instances based on the load.
Edit web_server.rb recipe so it will look like below. (Recipe file is located here at `~/chef/cookbooks/workshop/recipes/web_server.rb.)
#
# Recipe:: web_server
#
# Copyright (c) 2016 The Authors, All Rights Reserved.

config = data_bag_item('workshop_bag', 'config')
instances_data_bag = data_bag('aws_opsworks_instance')

package 'httpd' do
  action :install
end

directory '/var/www/html' do
  recursive true
end

template '/etc/httpd/conf.d/hello.conf' do
  source 'hello.conf.erb'
  mode '0644'
  owner node['workshop']['user']
  group node['workshop']['group']
  notifies :restart, 'service[httpd]'
end

template '/var/www/html/hello.html' do
  source 'hello.html.erb'
  mode '0644'
  owner node['workshop']['user']
  group node['workshop']['group']
  variables({
              :name => config['name'],
              :instances => instances_data_bag
            })
end

service 'httpd' do
  action [:enable, :start]
end
Create update recipe.
$ cd ~/chef/cookbooks
$ chef generate recipe workshop update
$ cd workshop/recipes
Add the code below to update.rb. It is actually a section of web_server recipe. We could include update recipe in web_server recipe in order not to repeat the code. For the sake of this example, we are just copying it.
config = data_bag_item('workshop_bag', 'config')
instances_data_bag = data_bag('aws_opsworks_instance')

template '/var/www/html/hello.html' do
  source 'hello.html.erb'
  mode '0644'
  owner node['workshop']['user']
  group node['workshop']['group']
  variables({
              :name => config['name'],
              :instances => instances_data_bag
            })
end
Edit hello.html.erb template so it will look like below.
$ cd ~/chef/cookbooks/workshop/templates/
$ [your editor here] hello.html.erb

<html>
  Hello AWS World! <br>
  Application: <%= @name %> (-> comes from data bag) <br>
  This is <%= node['hostname'] %> (-> comes from node attributes) <br>
  <b>All Instances:</b> (-> comes from OpsWorks data bag)<br>
  <% @instances.each do |instance| %>
  <%= "#{instance} <br>" %>
  <% end %>
</html>
Package and upload the cookbook to S3.
$ cd ~/chef/cookbooks/workshop
$ berks package workshop-cookbook.tar.gz; aws s3 cp workshop-cookbook.tar.gz s3://oz-opsworks/workshop-cookbook.tar.gz
Add Instances
Click Instances from the left navigation, click Add Instance and choose size and subnet for the instance. You can use the proposed name or enter a new one.

Click + Instance to add another one. Instances sizes can be different if you like.
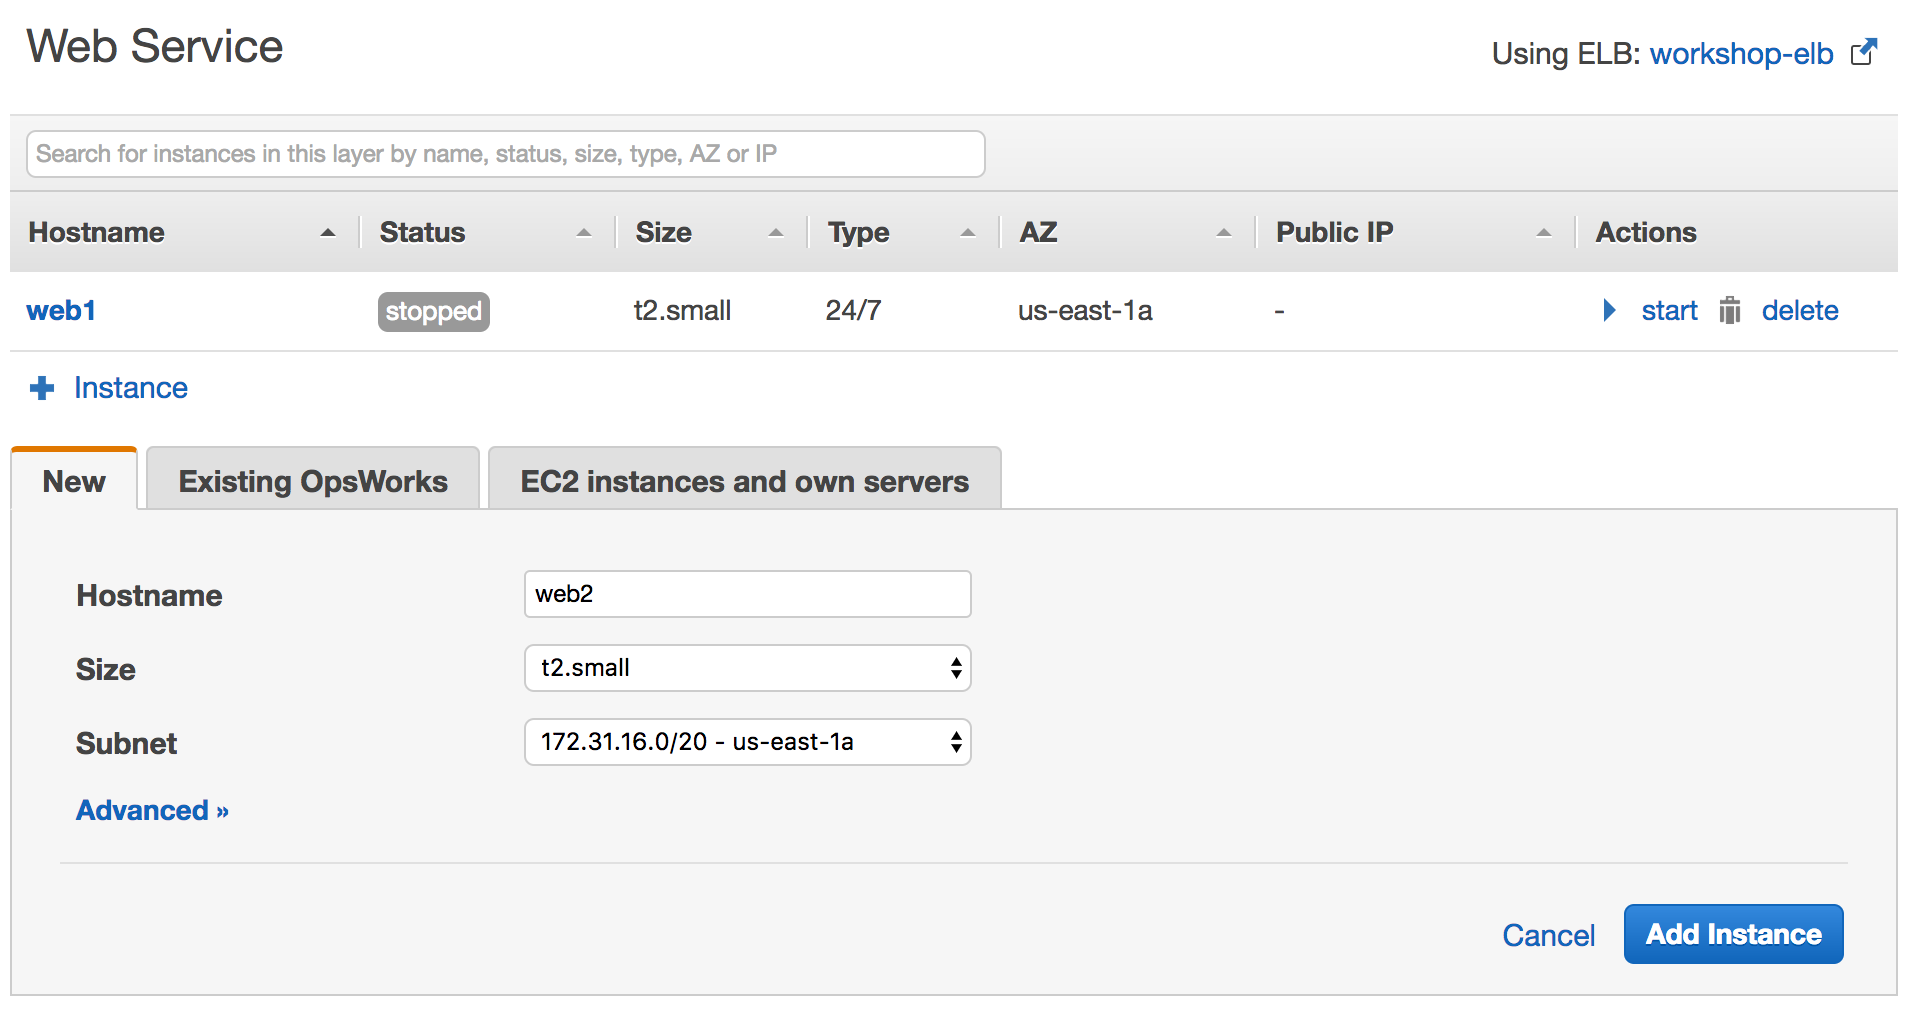
Once you see two instances there, click Start All Instances.
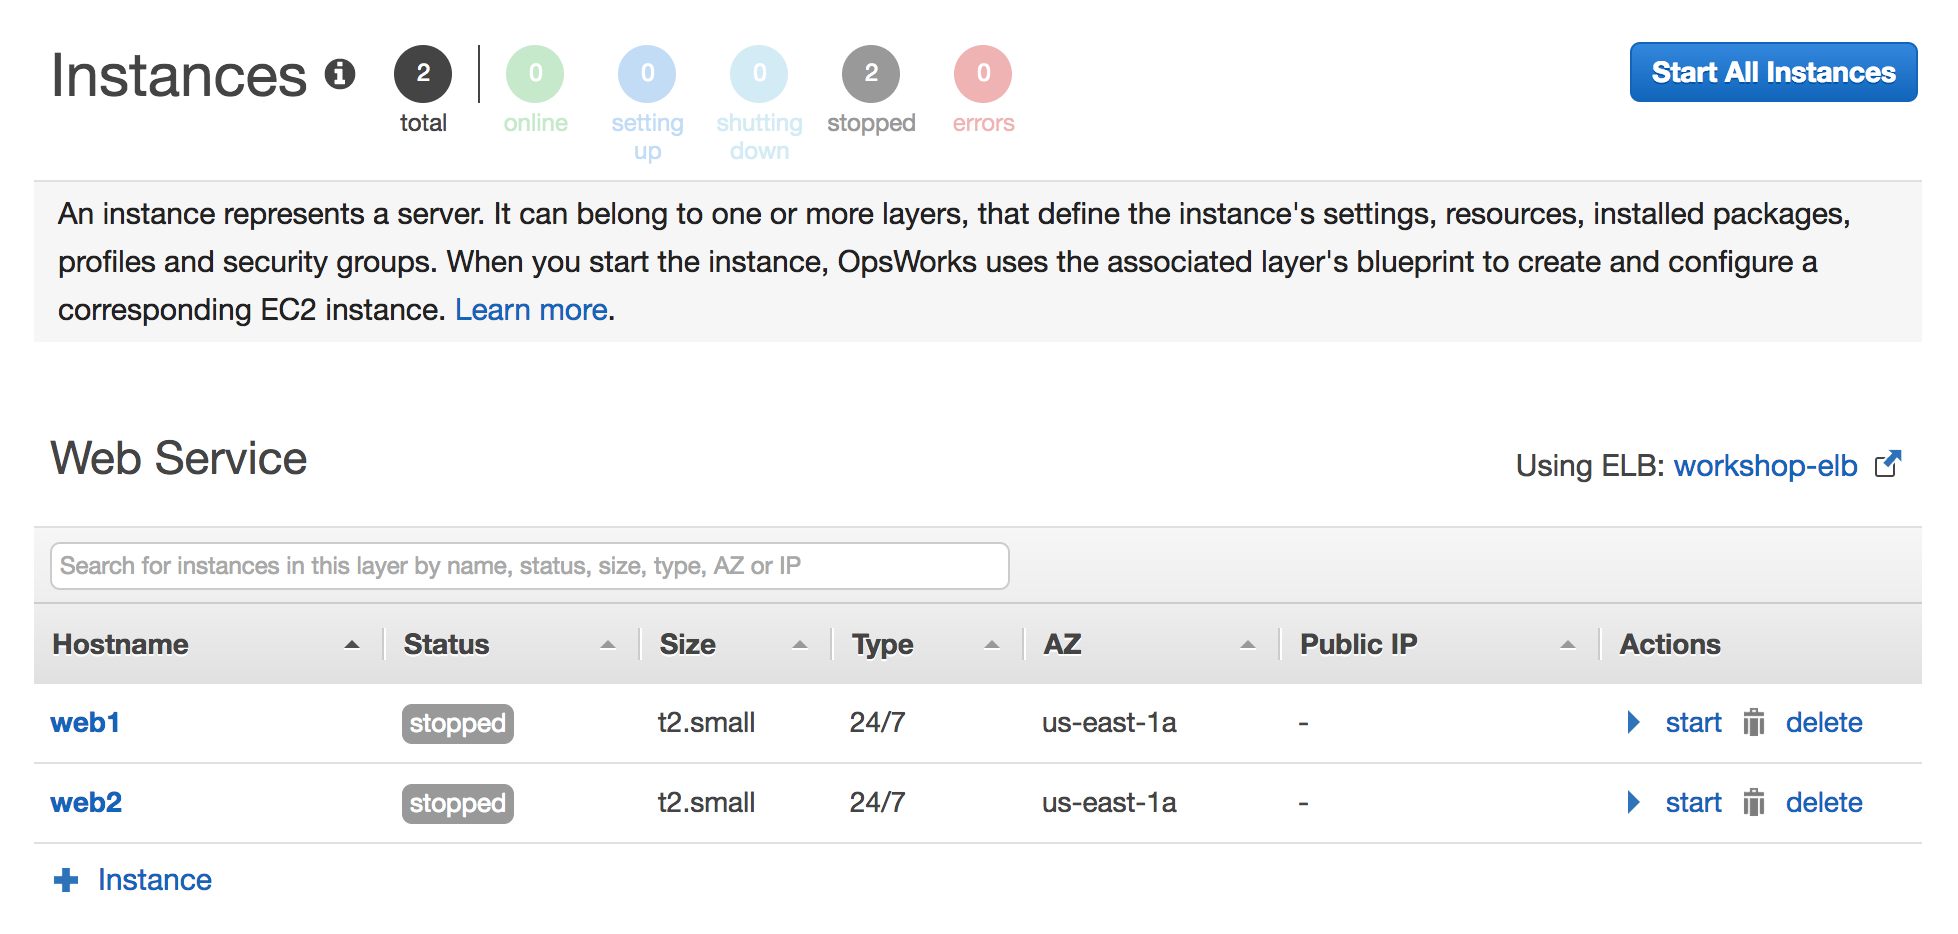
Instances will boot and OpsWorks will be running recipes on them.
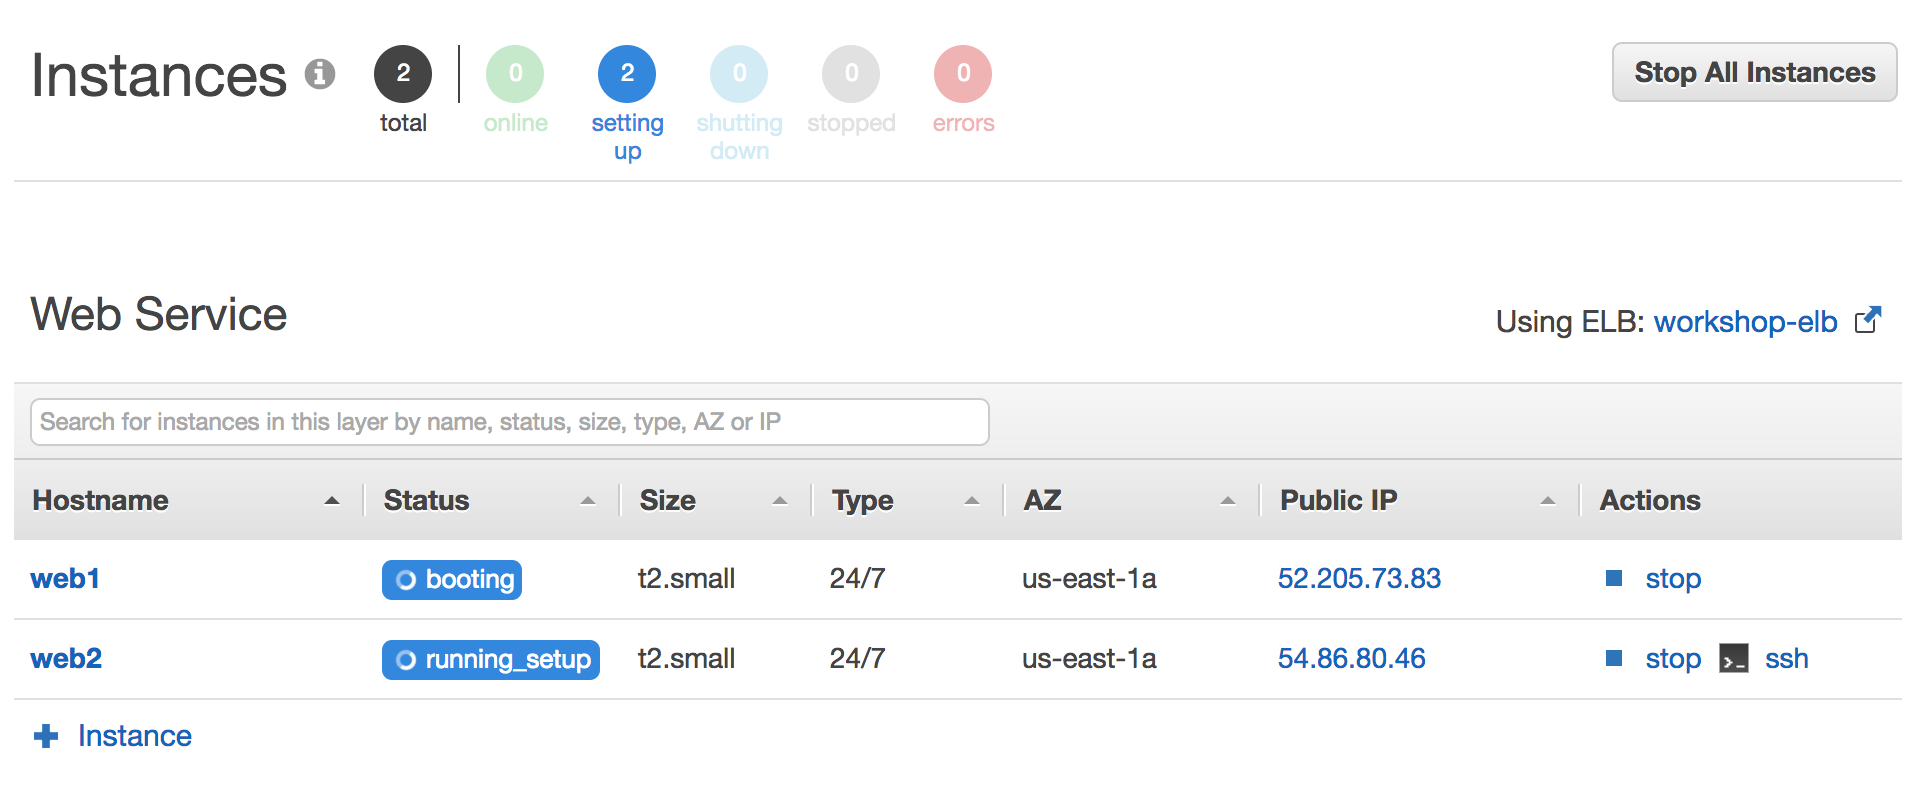
After several minutes, both instances will come online. It will take longer than a plain EC2 instance boot as OpsWorks will run Chef recipes on these instances. The more you do with the Chef recipes, the longer it will take for instances to boot up.
Check the Web Site
Click Layer from the left navigation bar. As seen in the screenshot below, you will find the public DNS record for the ELB. Click the link.
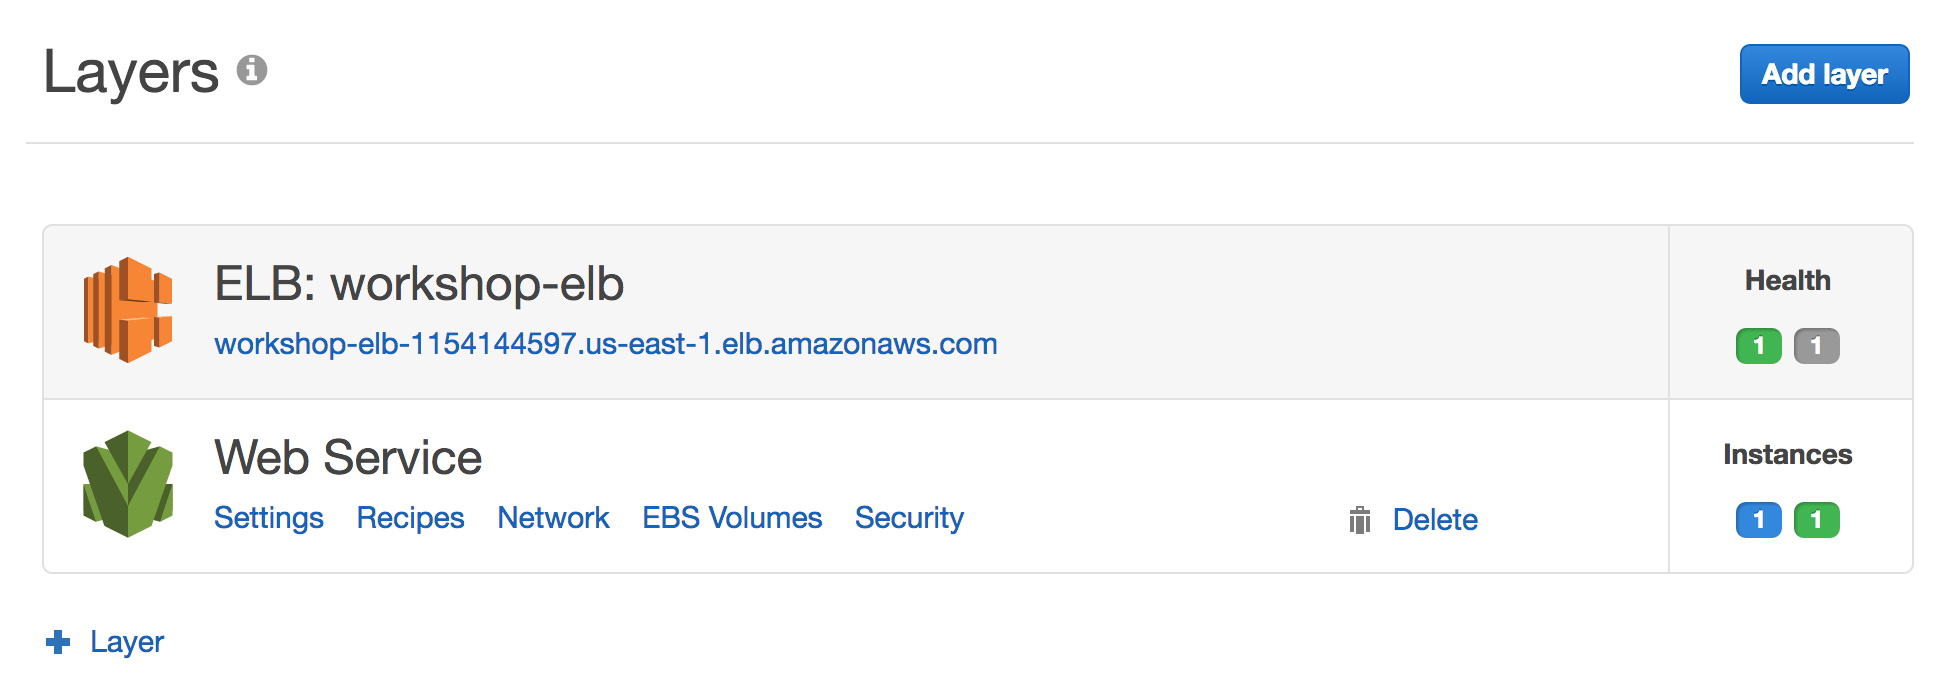
Check ELB public URL on the browser. Your http request will go through ELB and hit one of the web servers OpsWorks provisioned using the workshop cookbook.
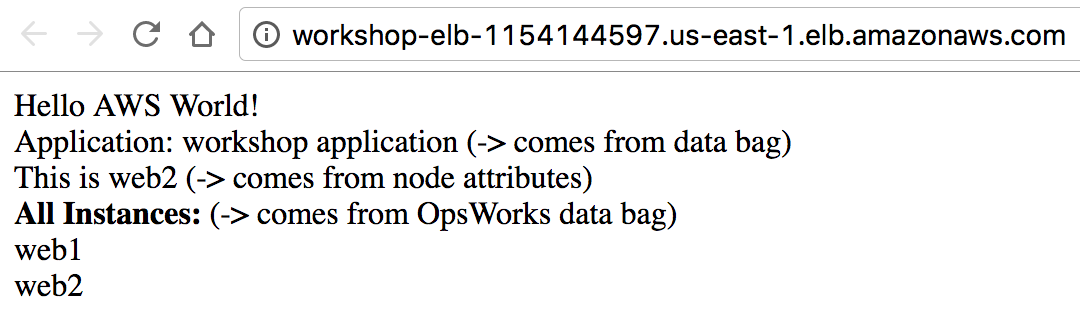
First request hits Web2
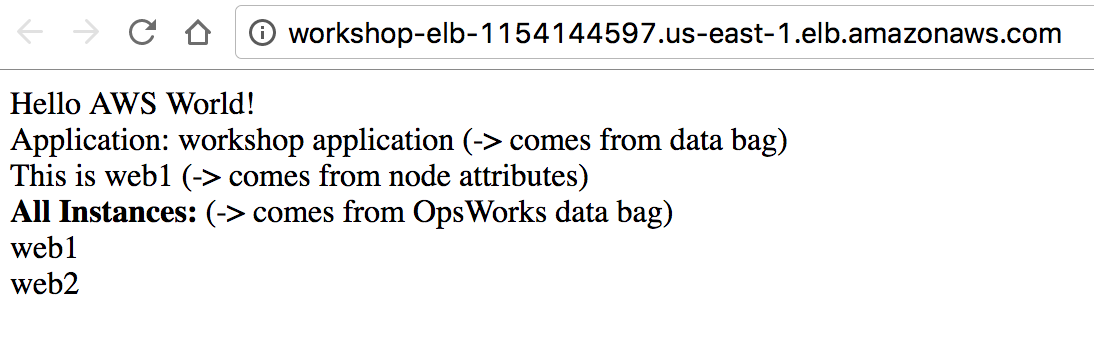
When I reload the page, this time request goes to Web1
If we add another instance, for example Web3, OpsWorks would automatically run configure lifecycle event on the existing instances. This event would call update recipe, which would then update hello.html template and include all the instances in the layer using aws_opsworks_instance data bag. This mechanism helps creating dynamic recipes that can take environment changes into account.
Going a step further, you can check the state of the instance and print it in the hello.html only if it is in running state. The recipe right now, just checks the instances in the layer and prints them even if they are not running.
Summary
In this workshop, we used the cookbook we created in Hands on Chef workshop and to get most out of OpsWorks, we used OpsWorks data bag named aws_opsworks_instance to find out the instances in the stack. Using lifecycle events, instances in the environment automatically changed their configuration (hello.html) when an instance was added to the layer.