Basic concepts and terms
Cloud Custodian works with the following basic concepts, terms, and relationships between them.
Policy
Defined in yaml, specifies a set of filters and actions to take on a given AWS resource type.
Resource
Provides for retrieval of a resource of a given type (typically via AWS API) and defines the vocabulary of filters and actions that can be used on those resources (e.g., ASG, S3, EC2, ELBs, etc).
Mode
Defines how the policy will execute (lambda, config rule, poll, etc).
1
2
3
4
|
mode:
type: cloudtrail
events:
  - RunInstances
|
Filters
Given a set of resources, how we filter to the subset that we’re interested in operating on. The filtering language has some default behaviors across resource types like value filtering with JMESPath expressions against the JSON representation of a resource, as well as specific filters for particular resources types (instance age, tag count, etc).
 1
 2
 3
 4
 5
 6
 7
 8
 9
10
11
12
|
filters:
- "tag:aws:autoscaling:groupName": absent
- type: ebs
    key: Encrypted
    value: false
    skip-devices:
    - "/dev/sda1"
    - "/dev/xvda"
- type: event
    key: "detail.userIdentity.sessionContext.sessionIssuer.userName"
    value: "SuperUser"
    op: ne
|
Actions
A verb to use on a given resource, i.e. stop, start, suspend, delete, encrypt, etc.
1
2
3
4
5
6
|
actions:
- type: tag
    key: c7n_status
    value: "Unencrypted EBS! Please recreate with Encryption"
- type: terminate
    force: true
|
Create Required AWS Resources
Before you move forward be sure to have an IAM user that can create resources on AWS. With this user you can login to AWS Console or use aws-cli in order to create the required resources. We will also use this IAM user on custodian development instance.
For OS specific installation instructions check out AWS CLI Installation document.
- We will create a
EC2 Key Pair
- We will name this key EC2 Key Pair as
custodian-key.
- We will create a security group to allow ingress access for port 22
- Finally we will be creating an EC2 instance named
custodian01 as our Cloud Custodian development machine.
Create EC2 Key Pairs
Chef will need an EC2 key pair in order to login to EC2 instances that it will provison.
Switch to the folder where you keep your key pairs and create an EC2 Key pair named chef-dev01-key.
1
2
|
$ cd ~/Workdocs/keys # this is the folder where I keep key pairs
$ aws ec2 create-key-pair --key-name custodian-key --query 'KeyMaterial' --output text --region us-east-1 > custodian-key.pem
|
Now we have a .pem file.
1
2
|
$ ls custodian*.pem
custodian-key.pem  # we use this to login to `custodian01`
|
Change permission on these two .pem files.
1
|
$ chmod 600 custodian-key.pem
|
Create Security Group
To create a security group, we need to pick the VPC.
 1
 2
 3
 4
 5
 6
 7
 8
 9
10
11
12
13
14
15
16
17
18
19
|
$ aws ec2 describe-vpcs --region us-east-1
{
    "Vpcs": [
        {
            "VpcId": "vpc-6fe5000b",
            "InstanceTenancy": "default",
            "Tags": [
                {
                    "Value": "Default",
                    "Key": "Name"
                }
            ],
            "State": "available",
            "DhcpOptionsId": "dopt-928173f7",
            "CidrBlock": "172.31.0.0/16",
            "IsDefault": true
        }
    ]
}
|
I chose vpc-6fe5000b which is the default VPC. You can choose any VPC.
Now, we can create the security group.
1
2
3
4
|
$ aws ec2 create-security-group --group-name custodian-sg --description "Cloud Custodian security group" --vpc-id vpc-6fe5000b --region us-east-1
{
    "GroupId": "sg-987feee4"
}
|
Note the GroupId value as we are using it in the following commands to add ingress rules to the security group.
1
|
$ aws ec2 authorize-security-group-ingress --group-id sg-987feee4 --protocol tcp --port 22 --cidr 0.0.0.0/0 --region us-east-1
|
Let’s describe the security group to check the rules we’ve added.
 1
 2
 3
 4
 5
 6
 7
 8
 9
10
11
12
13
14
15
16
17
18
19
20
21
22
23
24
25
26
27
28
29
30
31
32
33
34
35
36
37
38
39
40
|
$ aws ec2 describe-security-groups --group-names custodian-sg --region us-east-1
{
    "SecurityGroups": [
        {
            "IpPermissionsEgress": [
                {
                    "IpProtocol": "-1",
                    "PrefixListIds": [],
                    "IpRanges": [
                        {
                            "CidrIp": "0.0.0.0/0"
                        }
                    ],
                    "UserIdGroupPairs": [],
                    "Ipv6Ranges": []
                }
            ],
            "Description": "Cloud Custodian security group",
            "IpPermissions": [
                {
                    "PrefixListIds": [],
                    "FromPort": 22,
                    "IpRanges": [
                        {
                            "CidrIp": "0.0.0.0/0"
                        }
                    ],
                    "ToPort": 22,
                    "IpProtocol": "tcp",
                    "UserIdGroupPairs": [],
                    "Ipv6Ranges": []
                }
            ],
            "GroupName": "custodian-sg",
            "VpcId": "vpc-6fe5000b",
            "OwnerId": "676452272092",
            "GroupId": "sg-987feee4"
        }
    ]
}
|
Create Custodian Development Instance
List the subnet IDs available in your vpc (vpc-6fe5000b is the one I chose earlier).
 1
 2
 3
 4
 5
 6
 7
 8
 9
10
11
12
13
14
15
16
17
18
19
20
21
22
23
24
25
26
27
28
29
|
$ aws ec2 describe-subnets --filters "Name=vpc-id,Values=vpc-6fe5000b" --region us-east-1
{
    "Subnets": [
        {
            "VpcId": "vpc-6fe5000b",
            "AvailableIpAddressCount": 4079,
            "MapPublicIpOnLaunch": true,
            "DefaultForAz": true,
            "Ipv6CidrBlockAssociationSet": [],
            "State": "available",
            "AvailabilityZone": "us-east-1c",
            "SubnetId": "subnet-da8afdf1",
            "CidrBlock": "172.31.48.0/20",
            "AssignIpv6AddressOnCreation": false
        },
        {
            "VpcId": "vpc-6fe5000b",
            "AvailableIpAddressCount": 4075,
            "MapPublicIpOnLaunch": true,
            "DefaultForAz": true,
            "Ipv6CidrBlockAssociationSet": [],
            "State": "available",
            "AvailabilityZone": "us-east-1a",
            "SubnetId": "subnet-897032d0",
            "CidrBlock": "172.31.16.0/20",
            "AssignIpv6AddressOnCreation": false
        },
        ....
        ....
|
I chose subnet-897032d0 from the list.
I am creating custodian01 instance in subnet subnet-897032d0 and using security group sg-987feee4.
1
2
|
$ aws ec2 run-instances --image-id ami-0b33d91d --count 1 --instance-type t2.micro --key-name custodian-key --security-group-ids sg-987feee4 --subnet-id subnet-897032d0 --query 'Instances[0].{ID:InstanceId}'  --output text --region us-east-1
i-08d7b9609a8c1f12d
|
Add a name tag to the instance.
1
|
$ aws ec2 create-tags --resources i-08d7b9609a8c1f12d --tags Key=Name,Value=custodian01
|
Find public dns name for custodian01
1
2
|
$ aws ec2 describe-instances --instance-ids i-08d7b9609a8c1f12d --query 'Reservations[0].Instances[0].PublicDnsName' --output text --region us-east-1
ec2-52-90-80-237.compute-1.amazonaws.com
|
Copy custodian-key.pem from your computer to Custodian development instance. You can use scp or just copy paste the chef-user.pem file.
1
2
|
# on your laptop, in the folder where you have `pem` file.
$ scp -i custodian-key.pem custodian-key.pem ec2-user@ec2-52-55-208-165.compute-1.amazonaws.com:~/.ssh/custodian-key.pem
|
1
2
3
4
5
|
The authenticity of host 'ec2-52-55-208-165.compute-1.amazonaws.com (52.55.208.165)' can't be established.
ECDSA key fingerprint is SHA256:4gyFwnuRi68ZghCg3G8Wxtv9/2UlPR7cywHcogfaTYk.
Are you sure you want to continue connecting (yes/no)? yes
Warning: Permanently added 'ec2-52-55-208-165.compute-1.amazonaws.com,52.55.208.165' (ECDSA) to the list of known hosts.
custodian-key.pem                                                                                                                    100% 1671    28.2KB/s   00:00
|
Login to the custodian01 instance using public DNS name.
1
2
3
4
5
6
7
|
$ ssh ec2-user@ec2-52-55-208-165.compute-1.amazonaws.com -i ~/WorkDocs/keys/custodian-key.pem

    __|  __|_  )
    _|  (     /   Amazon Linux AMI
    ___|\___|___|

https://aws.amazon.com/amazon-linux-ami/2016.09-release-notes/
|
Do the updates and configure ssh timeout.
1
2
3
4
5
|
$ sudo yum update -y
$ echo "ServerAliveInterval 50" > ~/.ssh/config
$ chmod 644 ~/.ssh/config
$ sudo yum install tree -y #optional
$ sudo yum install emacs -y #optional
|
Change permissions of custodian.pem file.
1
|
$ chmod 600 /home/ec2-user/.ssh/custodian-key.pem
|
Finally create ~/.aws/credentials file and put credentials for an IAM user that can create use AWS API to run queries on resources.
1
2
3
|
[default]
aws_access_key_id = AKIAJGBFBGOJJJJMKYXQ
aws_secret_access_key = EnlAfEjw4S4JWfX9ABCAAAAAAAAAABC
|
If you prefer, create a screen session. More about screen is here.
Install Cloud Custodian
We will have to create a virtualenv in order to install Cloud Custodian properly. (Without a virtualenv everything except Lambda functionality works.)
1
2
3
4
5
6
|
$ virtualenv .custodian
$ source .custodian/bin/activate
$ sudo pip install c7n
...
...
Successfully installed boto3-1.4.4 botocore-1.5.7 c7n-0.8.22.0 functools32-3.2.3.post2 ipaddress-1.0.18 jsonschema-2.5.1 s3transfer-0.1.10
|
Create a folder to keep custodian configuration.
1
2
|
$ mkdir custodian; cd custodian/
$ mkdir output
|
Write Your First Policy
Under ~/custodian/ folder create a file named custodian.yml with the content below.
1
2
3
4
5
6
7
|
policies:
- name: my-first-policy
    resource: ec2
    filters:
    - "tag:Custodian": present
    actions:
    - stop
|
Run Your First Policy
1
|
$ custodian run --output-dir=output/ --config=custodian.yml --region=us-east-1
|
Output should look like below.
1
2
|
2017-02-01 18:33:25,557: custodian.policy:INFO Running policy my-first-policy resource: ec2 region:us-east-1 c7n:0.8.22.0
2017-02-01 18:33:26,445: custodian.policy:INFO policy: my-first-policy resource:ec2 has count:0 time:0.89
|
Since we didn’t have any instance tagged with Custodian, no instance was stopped.
Create A Test Instance
Now lets create an instance named custodian-test, tag it with Custodian and run this policy again.
1
2
|
$ INSTANCE=`aws ec2 run-instances --image-id ami-0b33d91d --count 1 --instance-type t2.micro --key-name custodian-key --security-group-ids sg-987feee4 --subnet-id subnet-897032d0 --query 'Instances[0].{ID:InstanceId}'  --output text --region us-east-1`
$ aws ec2 create-tags --resources $INSTANCE --tags Key=Name,Value=custodian-test Key=Custodian,Value= --region=us-east-1
|
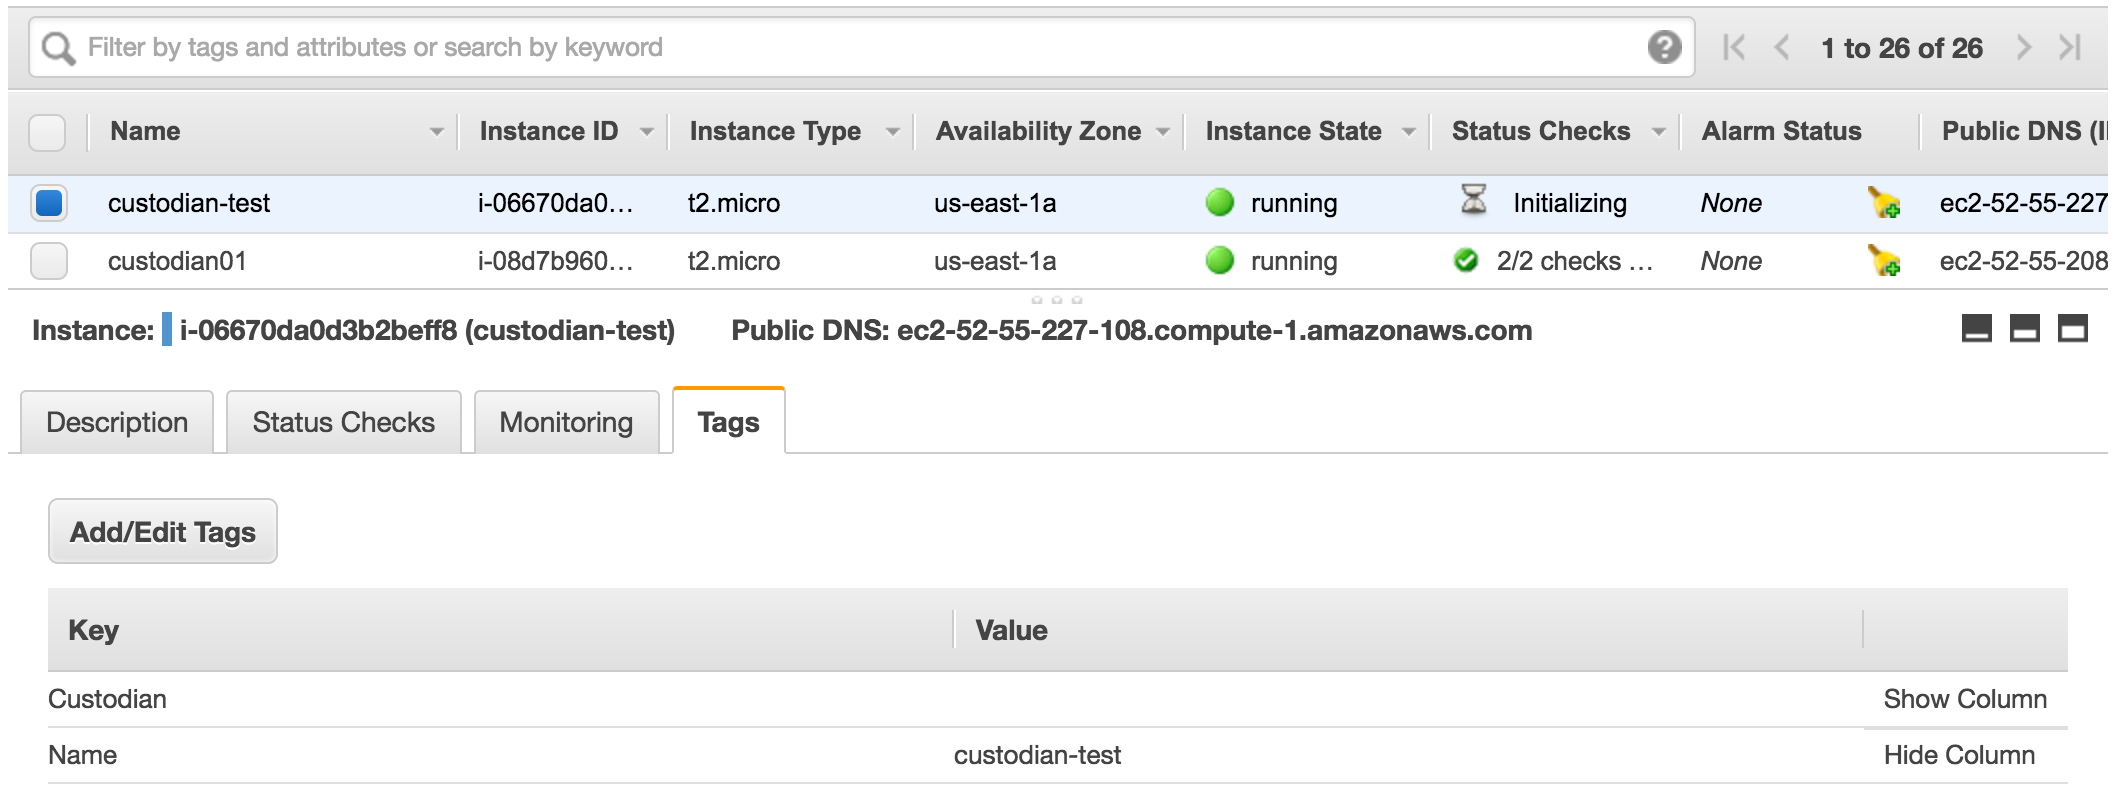
If you check on the console you can see we have an instance with Custodian tag.
Run Policy Again
Let’s run our first policy again.
1
2
3
4
5
|
$ custodian run --output-dir=output/ --config=custodian.yml --region=us-east-1
2017-02-01 18:48:28,354: custodian.policy:INFO Running policy my-first-policy resource: ec2 region:us-east-1 c7n:0.8.22.0
2017-02-01 18:48:28,860: custodian.policy:INFO policy: my-first-policy resource:ec2 has count:1 time:0.51
2017-02-01 18:48:28,861: custodian.actions:INFO Stop 1 of 1 instances
2017-02-01 18:48:29,038: custodian.policy:INFO policy: my-first-policy action: stop resources: 1 execution_time: 0.18
|
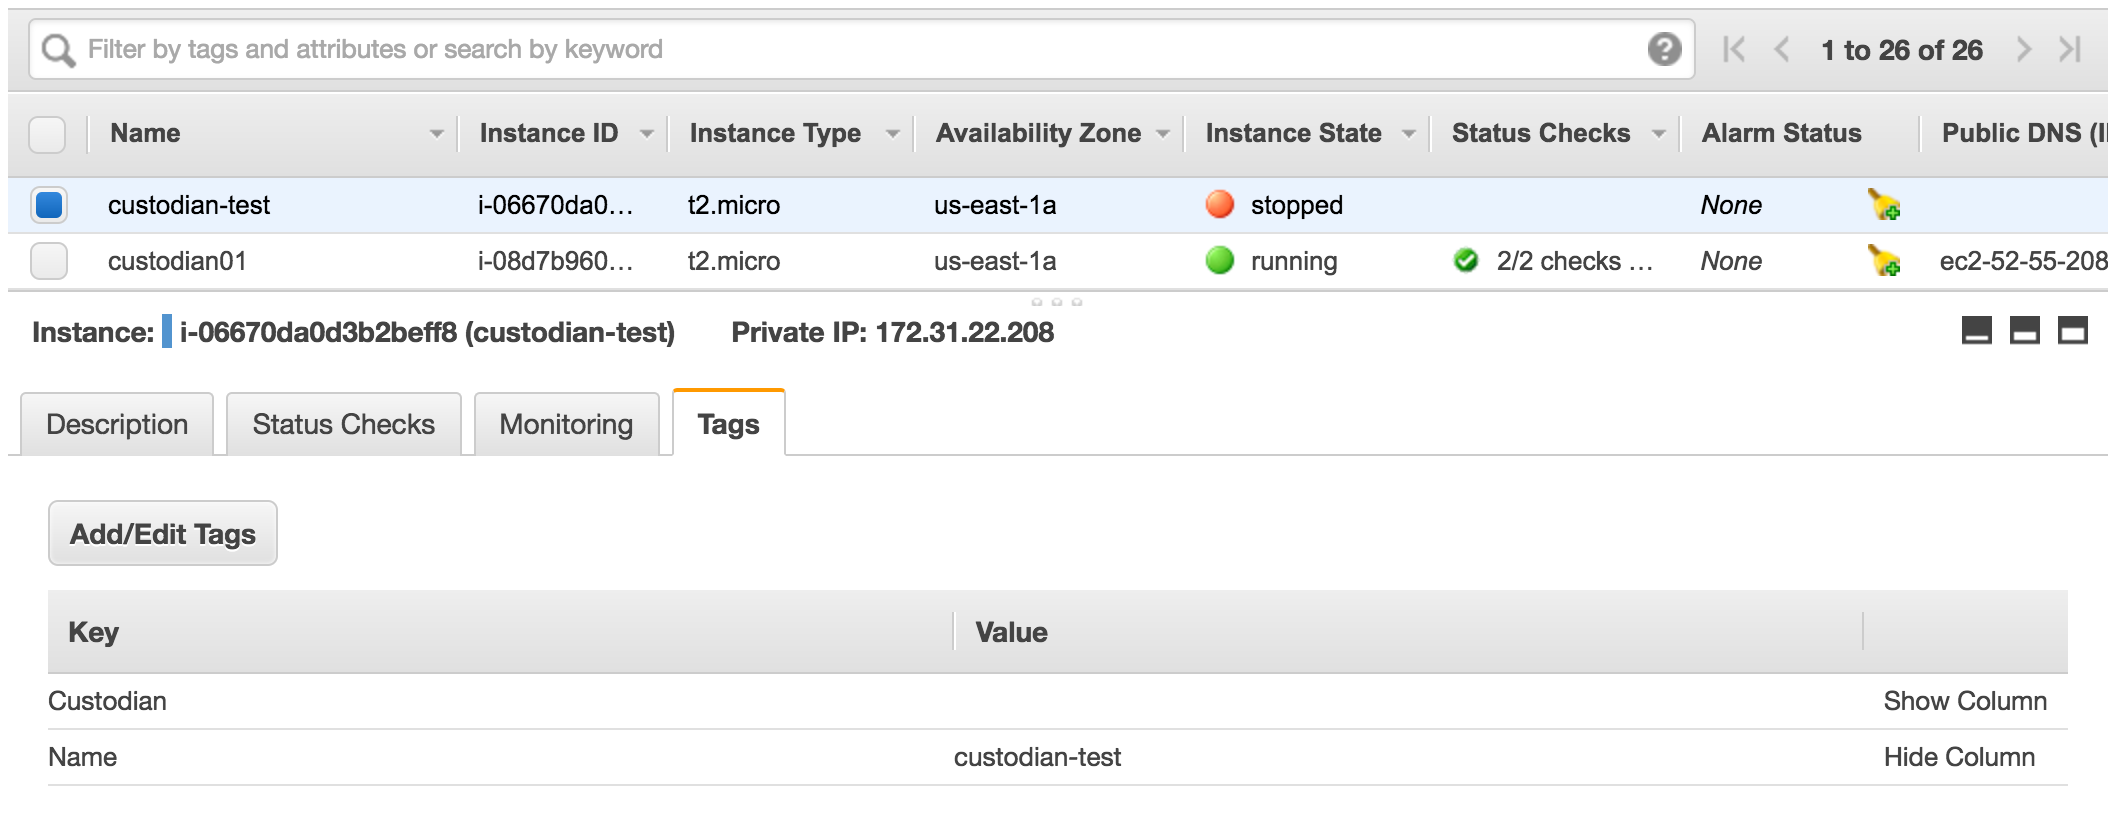
This time custodian found the instance with Custodian tag and stopped it.
If custodian can not match the instance, wait a few minutes and run the command again.
Getting Familiar with Custodian
Supported Resources
Let’s find which resources Custodian supports.
 1
 2
 3
 4
 5
 6
 7
 8
 9
10
11
12
13
14
15
|
$ custodian schema
resources:
- account
- acm-certificate
- alarm
- ami
...
...
- ec2
- ecr
...
...
- vpn-gateway
- waf
- waf-regional
|
Let’s find what actions and filter Custodian has for ec2 resource.
1
2
3
4
5
6
7
8
|
$ custodian schema ec2
ec2:
actions: [auto-tag-user, invoke-lambda, mark, mark-for-op, modify-security-groups,
    normalize-tag, notify, remove-tag, rename-tag, resize, snapshot, start, stop,
    tag, tag-trim, terminate, unmark, untag]
filters: [and, default-vpc, ebs, ephemeral, event, image, image-age, instance-age,
    instance-uptime, marked-for-op, metrics, offhour, onhour, or, security-group,
    state-age, subnet, tag-count, value]
|
In our first policy we already used stop action and tag filter.
We want to go a step further and tag the instance we shutdown with Custodian.
Let’s see details on tag actions.
 1
 2
 3
 4
 5
 6
 7
 8
 9
10
11
12
13
14
15
16
17
18
19
|
$ custodian schema ec2.actions.tag

Help
----

Tag an ec2 resource.


Schema
------

{   'additionalProperties': False,
    'properties': {   'key': {   'type': 'string'},
                    'tag': {   'type': 'string'},
                    'tags': {   'type': 'object'},
                    'type': {   'enum': ['tag', 'mark']},
                    'value': {   'type': 'string'}},
    'required': ['type'],
    'type': 'object'}
|
Modify custodian.yml from this
1
2
3
4
5
6
7
|
policies:
- name: my-first-policy
    resource: ec2
    filters:
    - "tag:Custodian": present
    actions:
    - stop
|
to this
 1
 2
 3
 4
 5
 6
 7
 8
 9
10
|
policies:
- name: my-first-policy
    resource: ec2
    filters:
    - "tag:Custodian": present
    actions:
        - stop
        - type: tag
        key: Custodian
        value: shutdown
|
Run the policy again
1
|
$ custodian run --output-dir=output/ --config=custodian.yml --region=us-east-1
|
If succeeded, output should be like below.
1
2
3
4
5
|
2017-02-01 19:34:34,351: custodian.policy:INFO Running policy my-first-policy resource: ec2 region:us-east-1 c7n:0.8.22.0
2017-02-01 19:34:34,353: custodian.policy:INFO policy: my-first-policy resource:ec2 has count:1 time:0.00
2017-02-01 19:34:34,353: custodian.actions:INFO Stop 0 of 1 instances
2017-02-01 19:34:34,353: custodian.policy:INFO policy: my-first-policy action: stop resources: 1 execution_time: 0.00
2017-02-01 19:34:34,563: custodian.policy:INFO policy: my-first-policy action: tag resources: 1 execution_time: 0.21
|
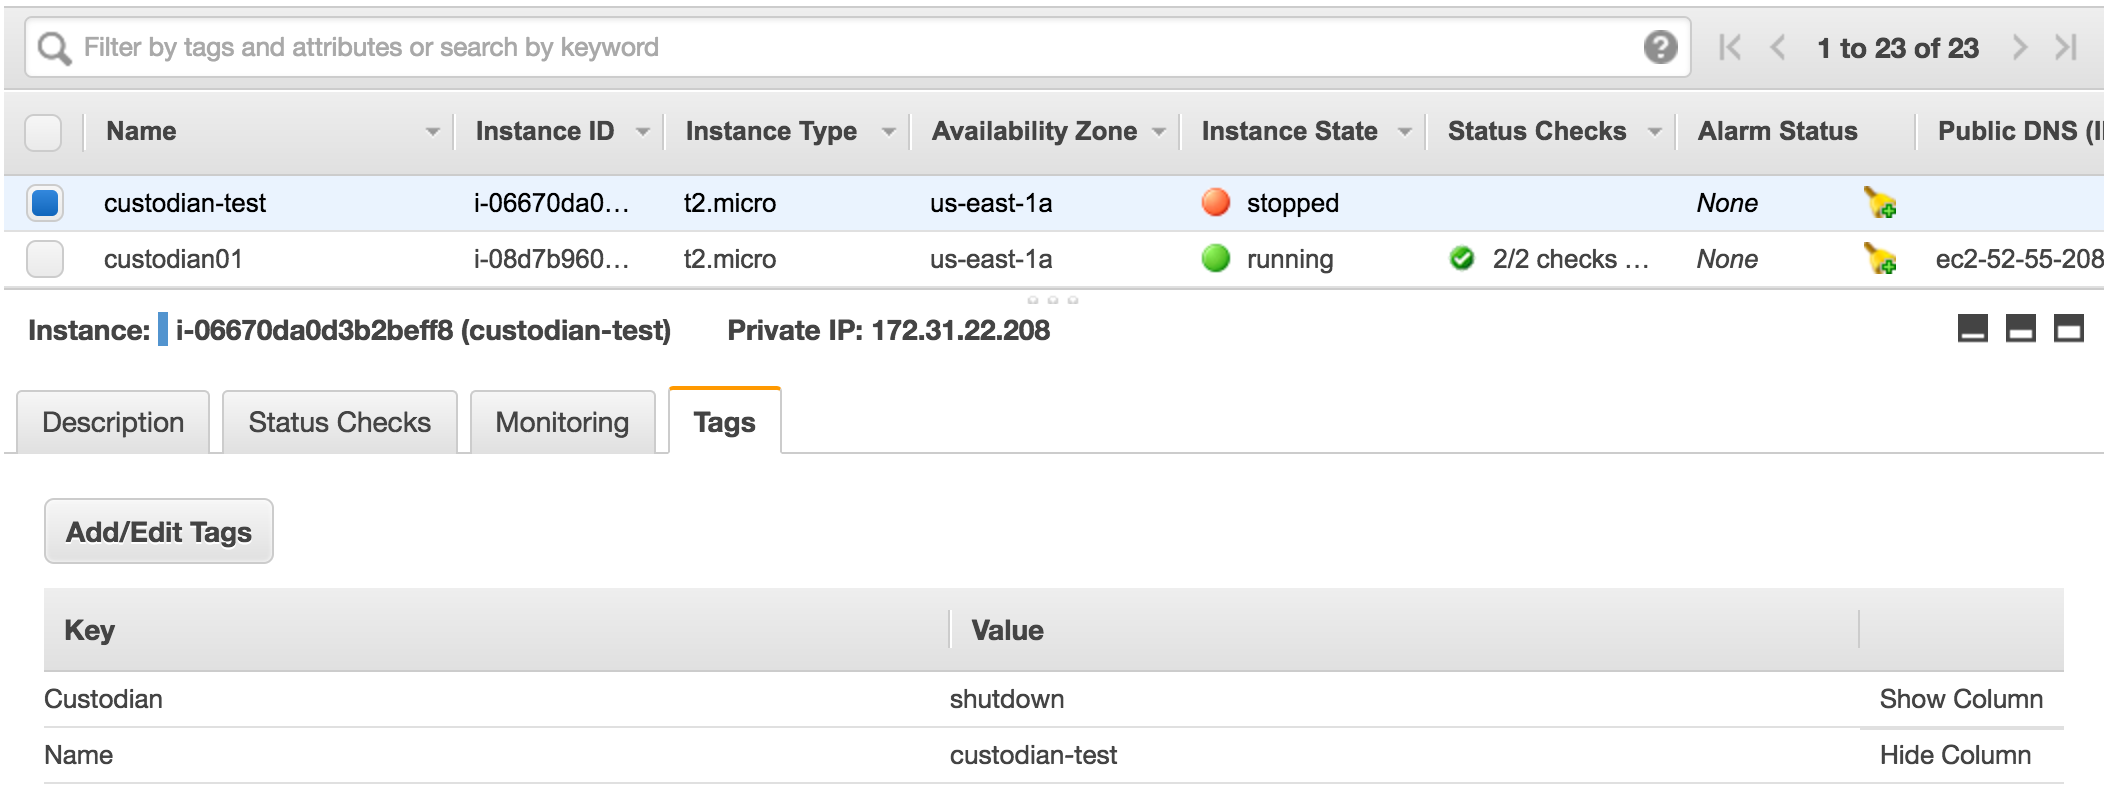
If you check the logs, you will see Custodian found a match and ran two actions listed in the policy.
We can check the tag on AWS Console.
Using Query Filters
In this case, custodian-test instance was already shutdown. We would like to have a policy which will only shutdown the instances that are running. We can achieve this using a query filter which is instance-state-name: running.
 1
 2
 3
 4
 5
 6
 7
 8
 9
10
11
12
|
policies:
- name: my-first-policy
    resource: ec2
    query:
    - instance-state-name: running
    filters:
    - "tag:Custodian": present
    actions:
    - stop
    - type: tag
        key: Custodian
        value: shutdown
|
When we run the policy again, we see it won’t match any instances as custodian-test is already in stopped state.
1
2
3
|
$ custodian run --output-dir=output/ --config=custodian.yml --region=us-east-1
2017-02-01 20:33:21,727: custodian.policy:INFO Running policy my-first-policy resource: ec2 region:us-east-1 c7n:0.8.22.0
2017-02-01 20:33:21,728: custodian.policy:INFO policy: my-first-policy resource:ec2 has count:0 time:0.00
|
Below are the valid EC2 query filters, as listed in the source code.
 1
 2
 3
 4
 5
 6
 7
 8
 9
10
11
12
13
14
15
16
17
18
19
20
|
EC2_VALID_FILTERS = {
    'architecture': ('i386', 'x86_64'),
    'availability-zone': str,
    'iam-instance-profile.arn': str,
    'image-id': str,
    'instance-id': str,
    'instance-lifecycle': ('spot',),
    'instance-state-name': (
        'pending',
        'terminated',
        'running',
        'shutting-down',
        'stopping',
        'stopped'),
    'instance.group-id': str,
    'instance.group-name': str,
    'tag-key': str,
    'tag-value': str,
    'tag:': str,
    'vpc-id': str}
|
Multiple Accounts via STS Assume Role
If you want to manage multiple AWS accounts, you will have to indicate a different cache file for each account. Below is the sample command that can be put in a cronjob.
1
2
3
4
5
6
7
8
9
|
/usr/local/custodian/bin/custodian run \
--cache-period=15 \
--cache /home/custodian/.accountname.cache \
-v \
-m \
-l /cloud-custodian/sts-prod/us-east-1 \
-s s3://mybucketnamehere/accounts/aws-account-name-here/us-east-1/policies \
--assume="arn:aws:iam::00000000000:role/Custodian" \
-c /etc/custodian/policies/hourly.yml &>> /var/log/custodian/hourly.log
|
Using CloudWatch Events
Before triggering a Custodian lambda function via events, we will create a new policy file named ami-policy.yml to check if the instance has the allowed AMIs. We will run this policy as we did previously from the command line.
 1
 2
 3
 4
 5
 6
 7
 8
 9
10
11
12
13
|
policies:
- name: ec2-ami-check
    resource: ec2
    filters:
    - type: value
        key: ImageId
        op: in
        value:
        - ami-0b33d91d
    actions:
        - type: tag
        key: ami-status
        value: approved
|
Now let’s run the policy.
1
2
3
4
5
|
$ custodian run --output-dir=output/ --config=ami-policy.yml --region=us-east-1
# output
2017-02-01 21:10:01,188: custodian.policy:INFO Running policy ec2-ami-check resource: ec2 region:us-east-1 c7n:0.8.22.0
2017-02-01 21:10:01,865: custodian.policy:INFO policy: ec2-ami-check resource:ec2 has count:2 time:0.68
2017-02-01 21:10:02,149: custodian.policy:INFO policy: ec2-ami-check action: tag resources: 2 execution_time: 0.28
|
So far we had created two instances. custodian01 and custodian-test from the same AMI with the id of ami-0b33d91d. Both of these matched the policy.
Being able to find instances which match the policy is very convenient but we wouldn’t like to run this policy over and over again. Instead we would like to run it only when a new instance is created.
Let’s change the policy mode so it will be deployed as a lambda function and will be triggered by RunInstance event. Notice the role we gave for the lambda function. This role will have to have the permissions to execute the action defined in the policy.
 1
 2
 3
 4
 5
 6
 7
 8
 9
10
11
12
13
14
15
16
17
18
|
policies:
- name: ec2-ami-check
    resource: ec2
    mode:
    type: ec2-instance-state
    role: arn:aws:iam::676452272092:role/lambdaAll
    events:
    - running
    filters:
    - type: value
        key: ImageId
        op: in
        value:
        - ami-0b33d91d
    actions:
    - type: tag
        key: ami-status
        value: approved
|
Now, run the policy.
1
2
3
4
5
|
$ custodian run --output-dir=output/ --config=ami-policy.yml --region=us-east-1
2017-02-01 21:36:47,878: custodian.policy:INFO Provisioning policy lambda ec2-ami-check
/usr/local/lib/python2.7/site-packages/c7n/mu.py:156: UserWarning: Duplicate name: './README'
self._zip_file.writestr(dest, contents)
2017-02-01 21:36:48,016: custodian.lambda:INFO Publishing custodian policy lambda function custodian-ec2-ami-check
|
Once the lambda function is deployed, create an instance with the AMI id ami-0b33d91d.
1
|
$ aws ec2 run-instances --image-id ami-0b33d91d --count 1 --instance-type t2.micro --key-name custodian-key --security-group-ids sg-987feee4 --subnet-id subnet-897032d0 --query 'Instances[0].{ID:InstanceId}' --output text --region us-east-1
|
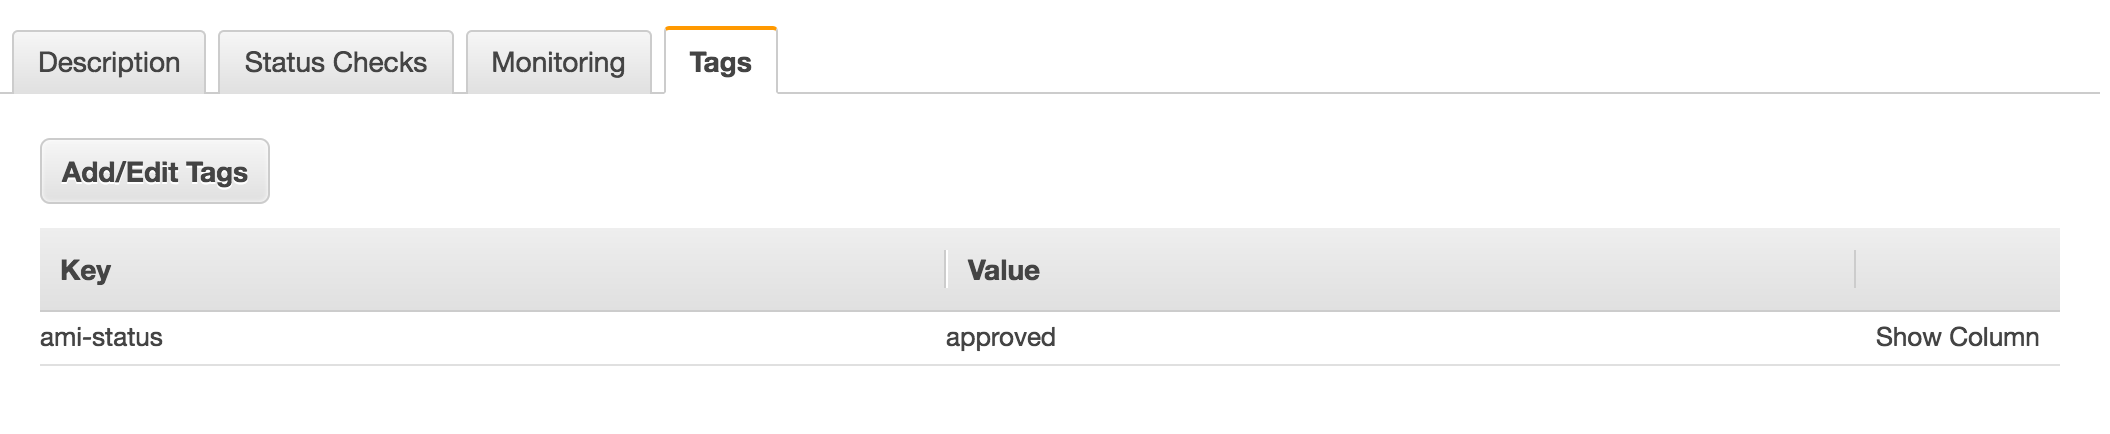
If you check the instance tags a few seconds after state turns into running you will see the ami-status tag on the instance.
It is also important to note, Custodian creates a CloudWatch Rule which triggers the lambda function. Policy name is used in these resources created by Custodian.
Examples
Terminating Instances without the approved AMIs
 1
 2
 3
 4
 5
 6
 7
 8
 9
10
11
12
13
14
15
16
17
18
19
20
21
22
23
|
policies:
- name: ec2-ami-check
    resource: ec2
    mode:
    type: ec2-instance-state
    role: arn:aws:iam::676452272092:role/lambdaAll
    events:
    - running
    filters:
    - type: value
        key: ImageId
        op: ni
        value:
        - ami-0b33d91d
        - ami-0b12dda1
    actions:
    - type: tag
        key: ami-status
        value: Unapproved AMI
    - stop
    - type: mark-for-op
        op: terminate
        days: 30
|
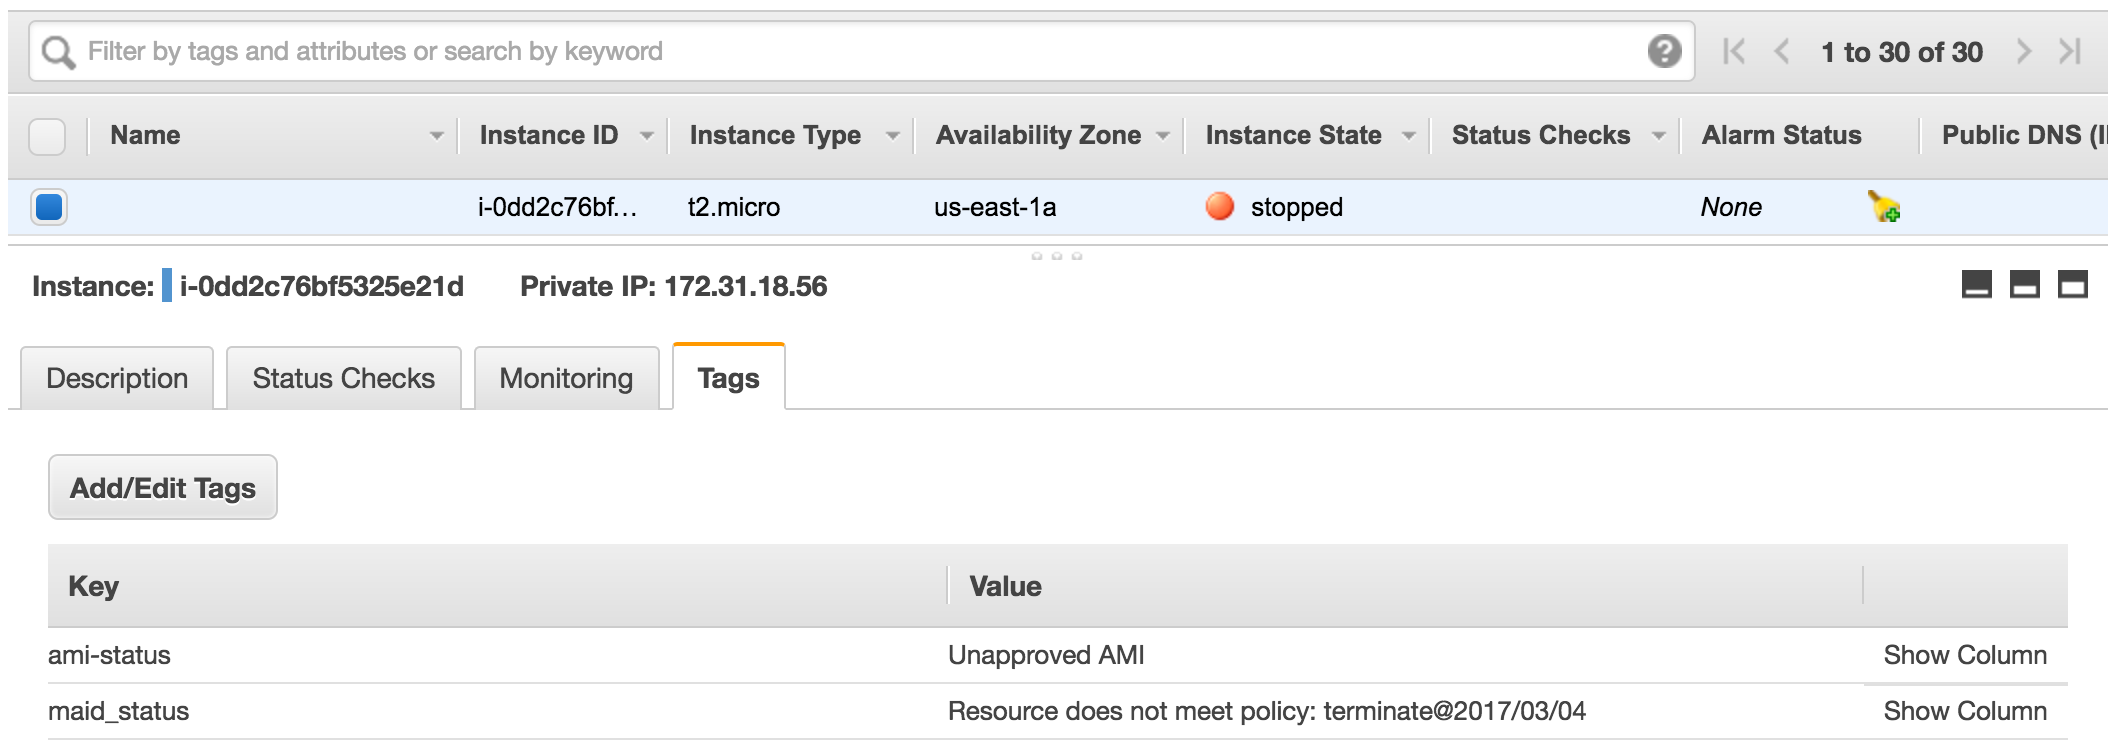
If you create the policy above and create an instance with an AMI different than the ones listed in the policy, the instance will be stopped and tagged as seen below.
A policy like the one seen below, would terminate the instance after 30 days.
1
2
3
4
5
6
7
8
9
|
- name: ec2-terminate-marked
resource: ec2
comments: |
    Delete any EC2 instances with un-approved AMIs after 30 days.
filters:
    - type: marked-for-op
        op: terminate
actions:
    - terminate
|
Multiple Resources and Policies in a Single File
The policy description below has two policies. One of the policies listen to EC2 instance status change the other one listens EBS volume creation. The main difference between these two is, EBS policy listens CloudTrail event which takes longer than a CloudWatch Event to appear.
 1
 2
 3
 4
 5
 6
 7
 8
 9
10
11
12
13
14
15
16
17
18
19
20
21
22
23
24
25
26
27
28
29
30
31
32
33
|
policies:
- name: ec2-ami-check
    resource: ec2
    mode:
    type: ec2-instance-state
    role: arn:aws:iam::676452272092:role/lambdaAll
    events:
        - running
    filters:
        - type: value
            key: ImageId
            op: ni
            value:
            - ami-0b33d91d
    actions:
    - type: tag
        key: ami-status
        value: Unapproved AMI
    - stop
    - type: mark-for-op
        op: terminate
        days: 30
- name: ebs-volume
    resource: ebs
    mode:
    type: cloudtrail
    role: arn:aws:iam::676452272092:role/lambdaAll
    events:
        - CreateVolume
    actions:
        - type: tag
        key: custodian
        value: Verified volume
|
When you run the policy above, Custodian will create two lambda functions as seen below.
1
2
3
4
5
6
|
$ custodian run  -c multi-test.yml -s . --region us-east-1

2017-02-02 17:27:27,127: custodian.policy:INFO Provisioning policy lambda ec2-ami-check
2017-02-02 17:27:27,471: custodian.lambda:INFO Publishing custodian policy lambda function custodian-ec2-ami-check
2017-02-02 17:27:28,800: custodian.policy:INFO Provisioning policy lambda ebs-volume
2017-02-02 17:27:28,887: custodian.lambda:INFO Publishing custodian policy lambda function custodian-ebs-volume
|
If you mix up push mode policies with pull mode policies, Custodian will deploy lambda functions for push policies and just run pull policies.
Scheduling policies
You can also schedule a policy to run as a scheduled lambda function by using periodic type.
 1
 2
 3
 4
 5
 6
 7
 8
 9
10
|
- name: tag-check
    resource: ec2
    mode:
    type: periodic
    role: arn:aws:iam::676452272092:role/lambdaAll
    schedule: "rate(1 day)"
    filters:
    - "tag:Custodian": present
    actions:
    - stop
|
Tips
You can validate the policy without running it.
1
|
$ custodian validate -c custodian.yml
|
You can also test the policy without running the actions
1
|
$ custodian run --dryrun -c custodian.yml -s .
|