Deploying Jenkins Docker Image using Amazon EC2 Container and Registry Services
It could be any containerized application but I picked Jenkins as it is one of the popular tools to provide continuous integration services for software development. As we all know, it is a server-based system running in a servlet container such as Apache Tomcat. If you don’t use AWS CodePipeline, Jenkins is a one of the popular choices.
Amazon EC2 Container Service, ECS in short, is a highly scalable, high performance container management service that supports Docker containers and allows you to easily run applications on a managed cluster of Amazon EC2 instances. (More on ECS Product page). You can also read this blog post to have a better understanding on ECS.
My goal in this article is to make deploying jenkins automated and repeatable by using ECS, ECR and CodeCommit.
This is what we will do:
- Create an EC2 instance to build docker images
- Create a CodeCommit repository to keep all our code
- Build Jenkins docker image
- Create an ECS Container Registry to upload docker image
- Create an ECS cluster to run our container
- Run Jenkins container on ECS
Create an EC2 Instance as a Development Docker Box
Instead of creating an IAM user which we can use on our own computer to access AWS APIs, we will create an IAM role for EC2 instance and use that instance as our development box. This way only secret you keep on your computer is the private ssh key. You can find more about IAM Roles for Amazon EC2 here.
Create Policy for the EC2 Role
We will create a role with enough privileges to run the API calls for the services we will use.
1- Go to IAM / Policies / Create Policy
2- Select Create Your Own Policy as seen in the picture below.
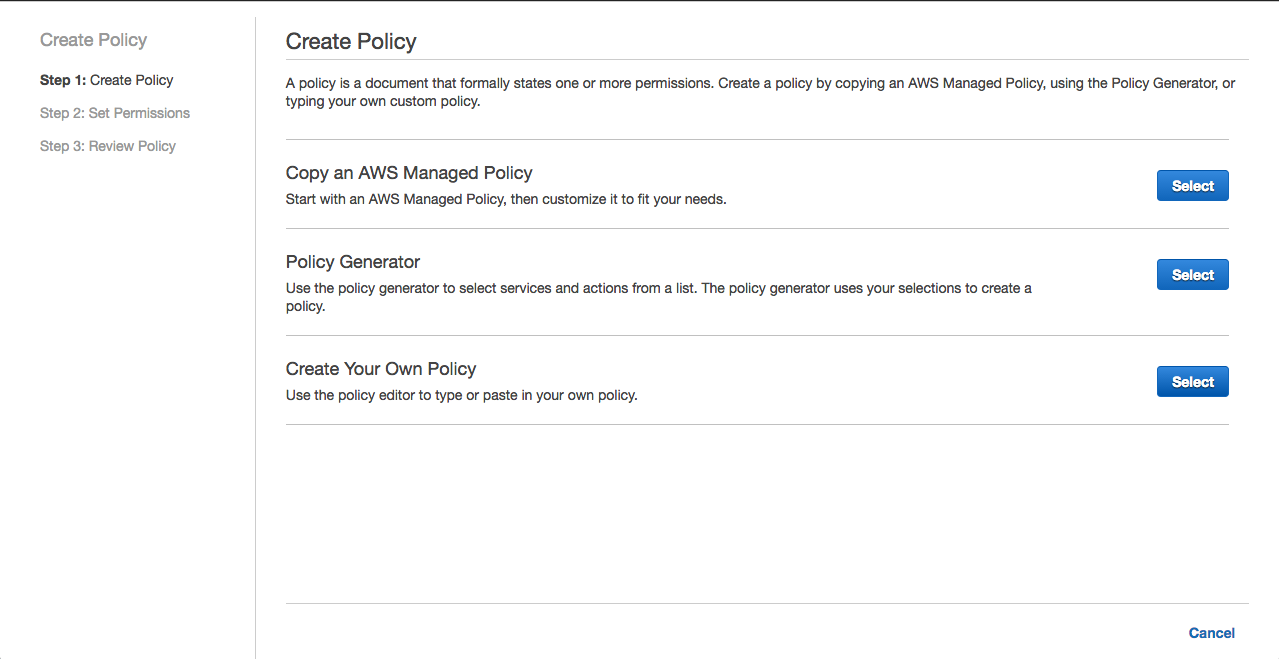
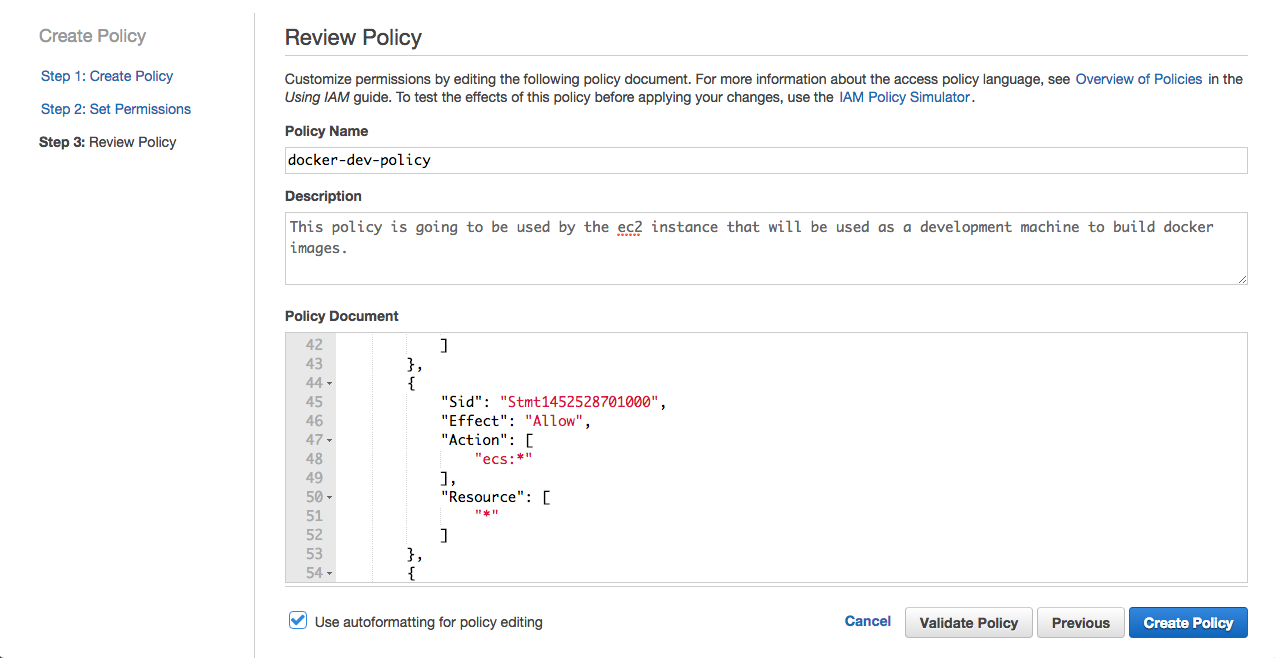
3- Copy the policy as seen below on the screenshot and paste in to the editor. Name the policy docker-dev-policy
{
    "Version": "2012-10-17",
    "Statement": [
        {
            "Sid": "Stmt1452528620000",
            "Effect": "Allow",
            "Action": [
                "cloudformation:*"
            ],
            "Resource": [
                "*"
            ]
        },
        {
            "Sid": "Stmt1452528644000",
            "Effect": "Allow",
            "Action": [
                "codecommit:*"
            ],
            "Resource": [
                "*"
            ]
        },
        {
            "Sid": "Stmt1452528674000",
            "Effect": "Allow",
            "Action": [
                "ec2:*"
            ],
            "Resource": [
                "*"
            ]
        },
        {
            "Effect": "Allow",
            "Action": "cloudwatch:*",
            "Resource": "*"
        },
        {
            "Effect": "Allow",
            "Action": "autoscaling:*",
            "Resource": "*"
        },
        {
            "Sid": "Stmt1452528689000",
            "Effect": "Allow",
            "Action": [
                "ecr:*"
            ],
            "Resource": [
                "*"
            ]
        },
        {
            "Sid": "Stmt1452528701000",
            "Effect": "Allow",
            "Action": [
                "ecs:*"
            ],
            "Resource": [
                "*"
            ]
        },
        {
            "Sid": "Stmt1452528728000",
            "Effect": "Allow",
            "Action": [
                "elasticloadbalancing:*"
            ],
            "Resource": [
                "*"
            ]
        },
        {
            "Sid": "Stmt1452616646000",
            "Effect": "Allow",
            "Action": [
                "iam:AttachRolePolicy",
                "iam:PassRole"
            ],
            "Resource": [
                "*"
            ]
        }
    ]
}
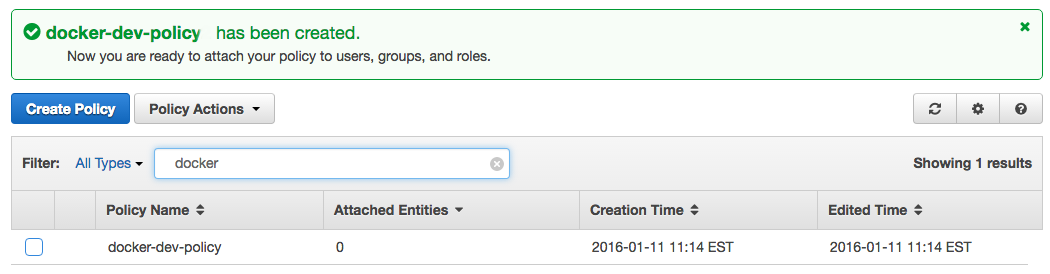
4- Click Create Policy and you will see the confirmation box. Also if you search for docker you will see the policy we just created.
Create IAM Role for EC2 Instance
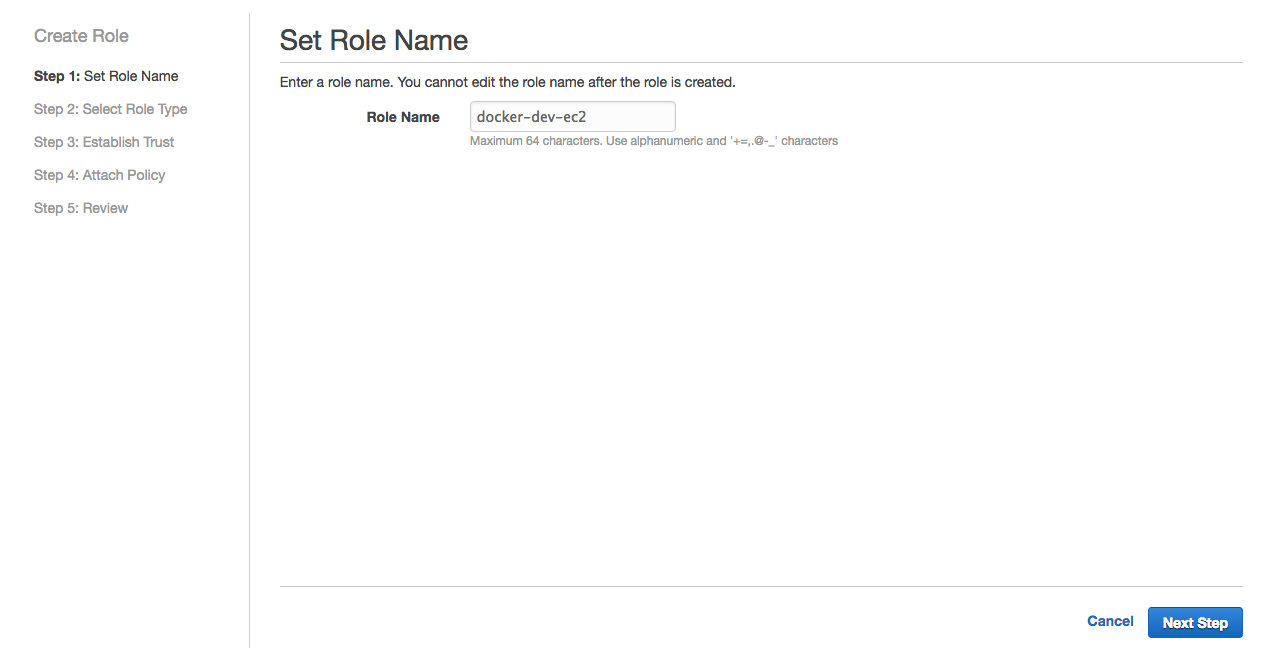
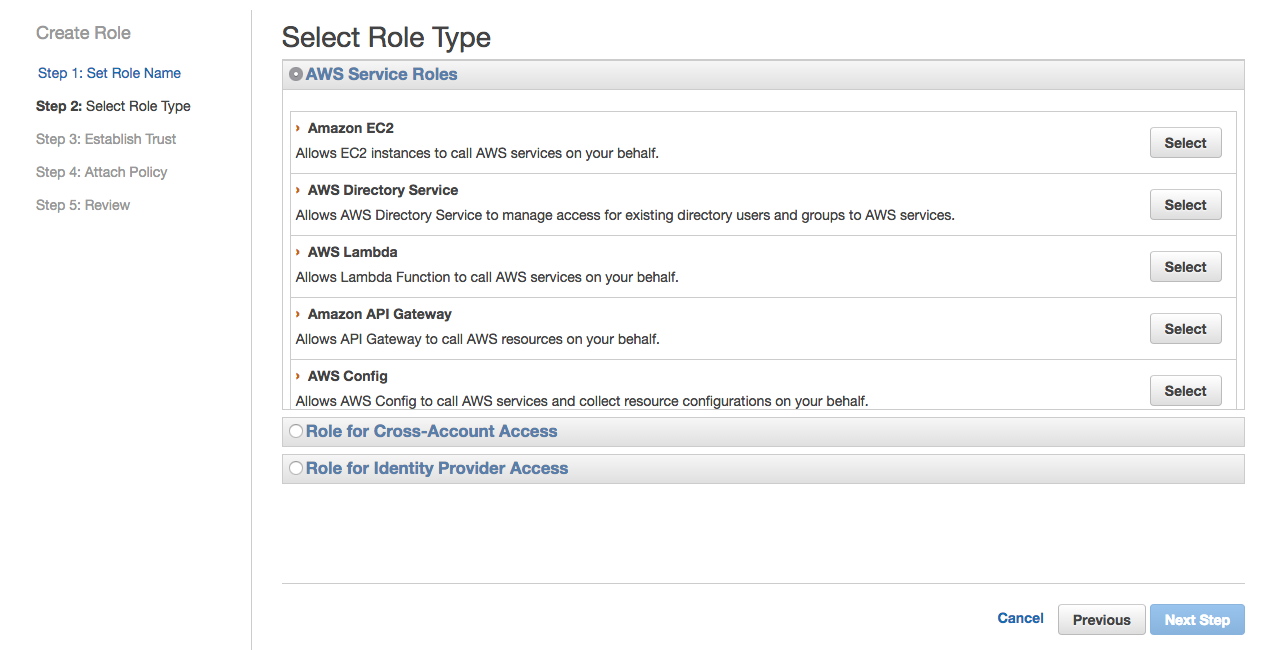
5- On IAM console (where you are at the moment), click Roles and then Create New Role. Name it docker-dev-ec2 click Next Step.
6- Select Amazon EC2
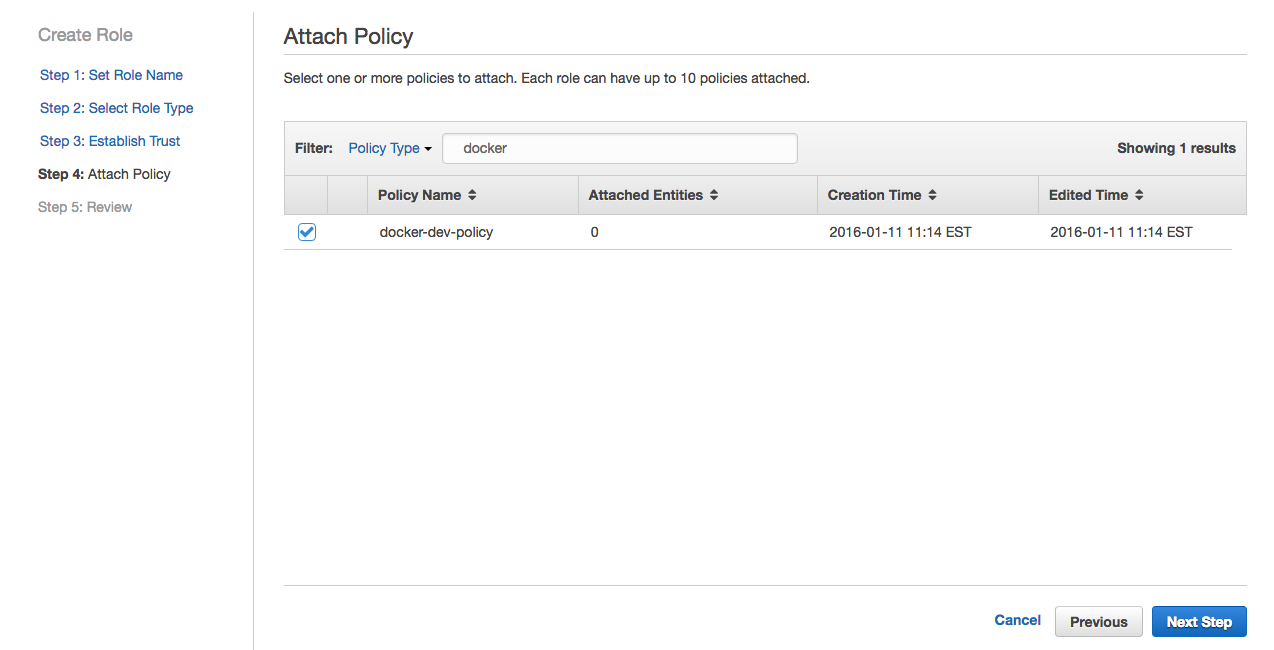
7- Search for docker to find the policy we created, as we will attach it to the EC2 IAM Role. Select docker-dev-policy in the search results and click Next Step.
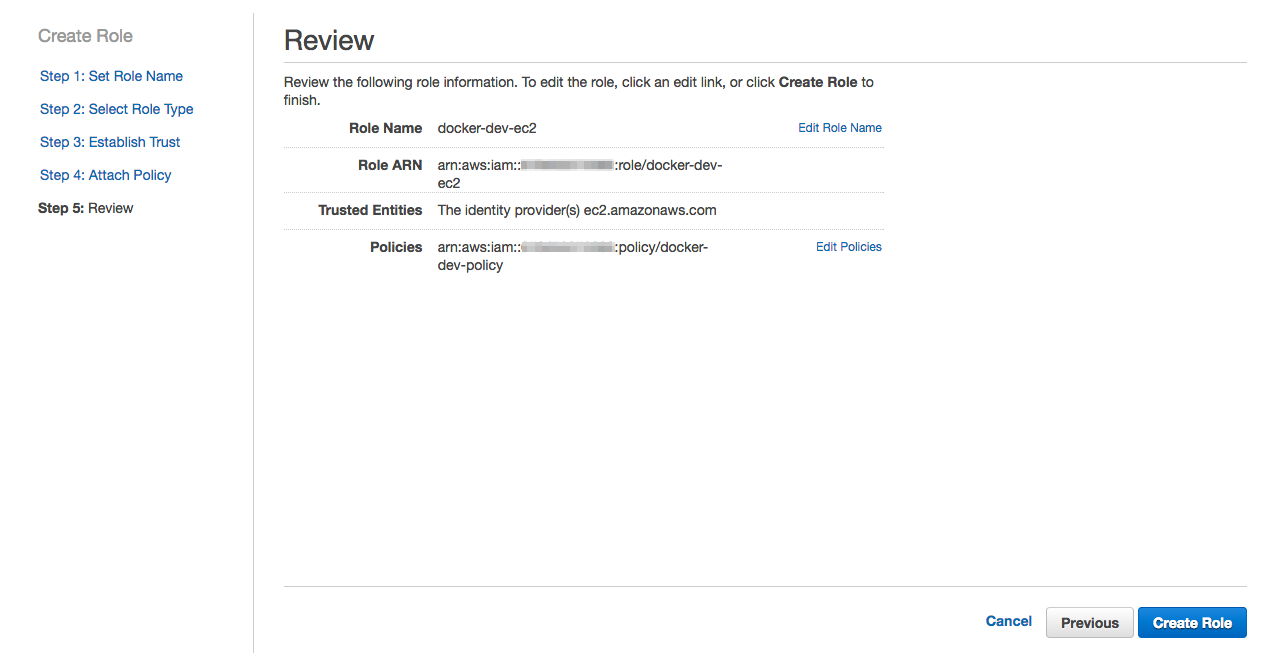
8- Review the role and click Create Role
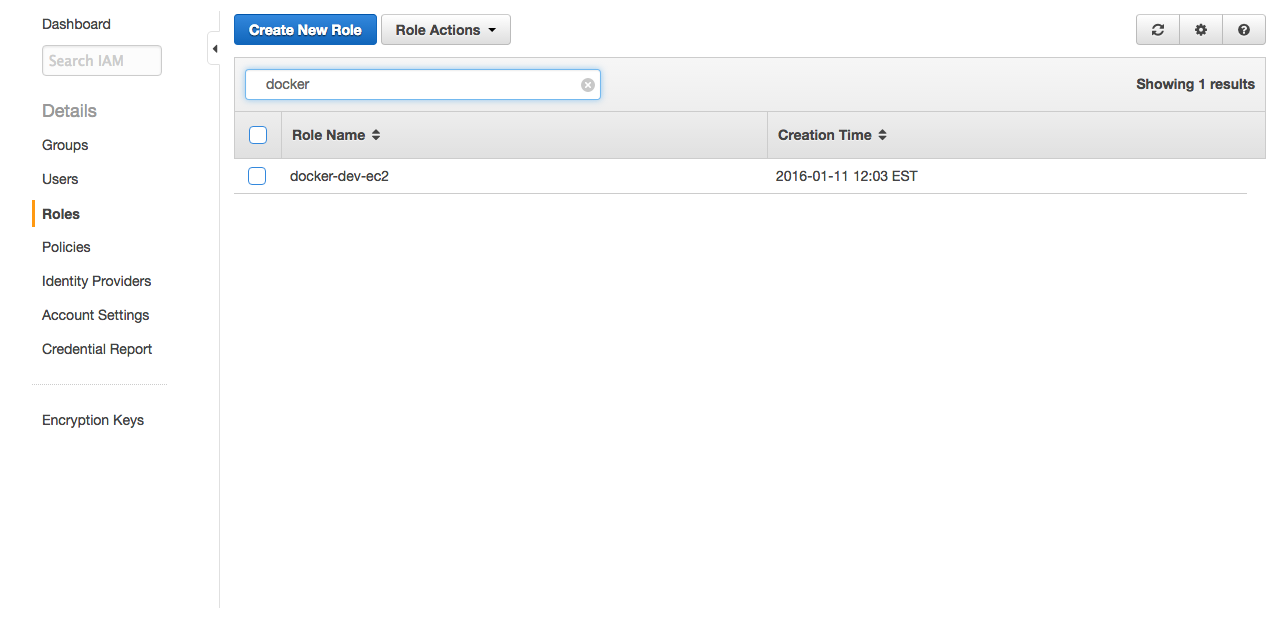
9- If you search for docker you should be able to find docker-dev-ec2 role we just created.
Create EC2 Instance
We will use this EC2 instance as our development box, it will provide full access to the services as we defined earlier with the policy.
10- Go to EC2 Console and click Launch Instance and select Amazon Linux AMI. (If you choose antoher AMI, commands we will use in the following steps to install docker may differ.)

11- Select t2.large or anything you see fit. Click Next. (While choosing insance type, consider we will build docker images and run containers on this instance. In any case, you can easily change instance type later on with a reboot.)

12- Choose docker-dev-ec2 role in the IAM Role section. Rest can stay same, or you may put the instance in a specific netork if you like. Click Next.
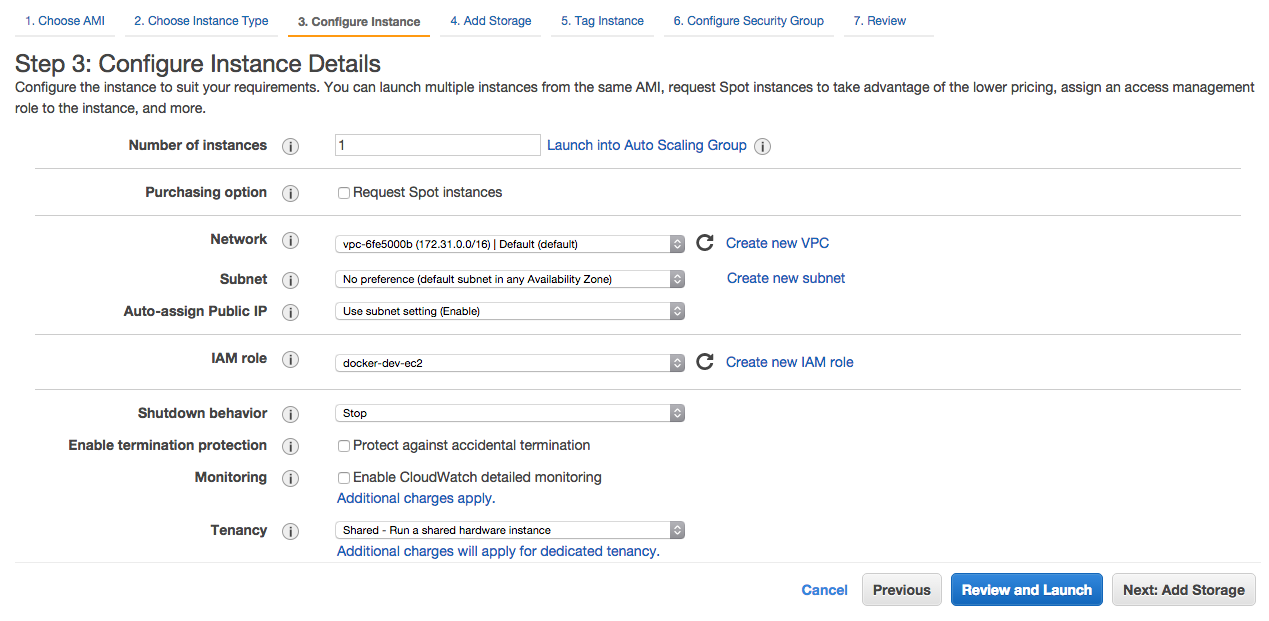
13- Add some storage as you may end up creating and keeping many docker images. When done, click Next.
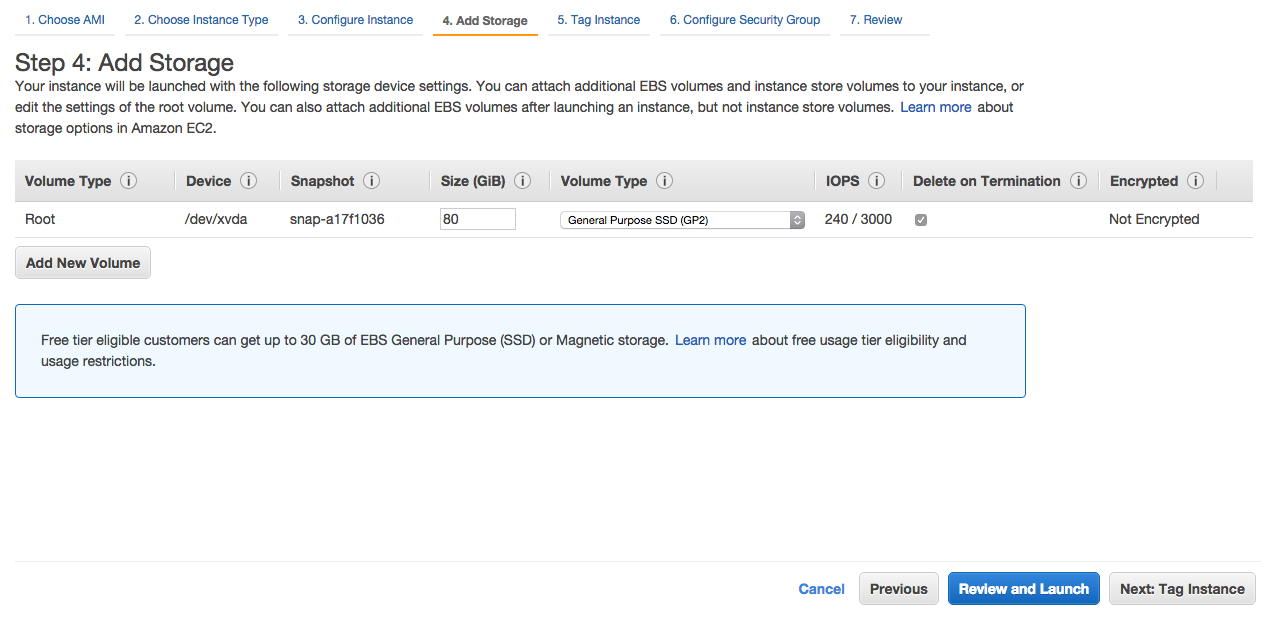
14- Tag the instance as Docker-Dev. Click Next.
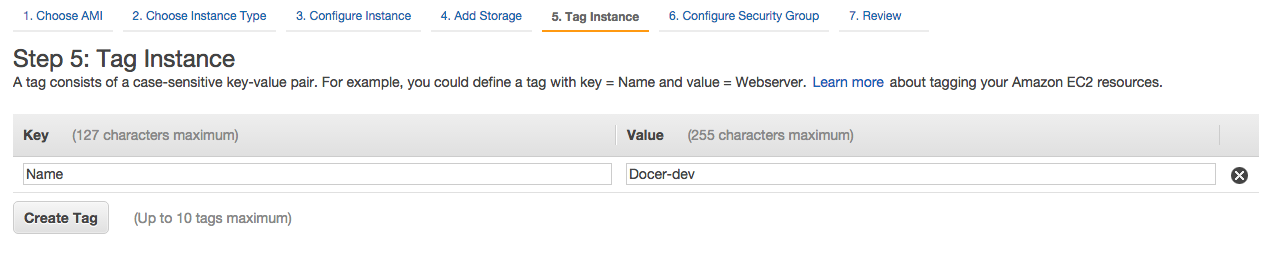
PS:
Docer-devin the screenshot above should beDocker-dev
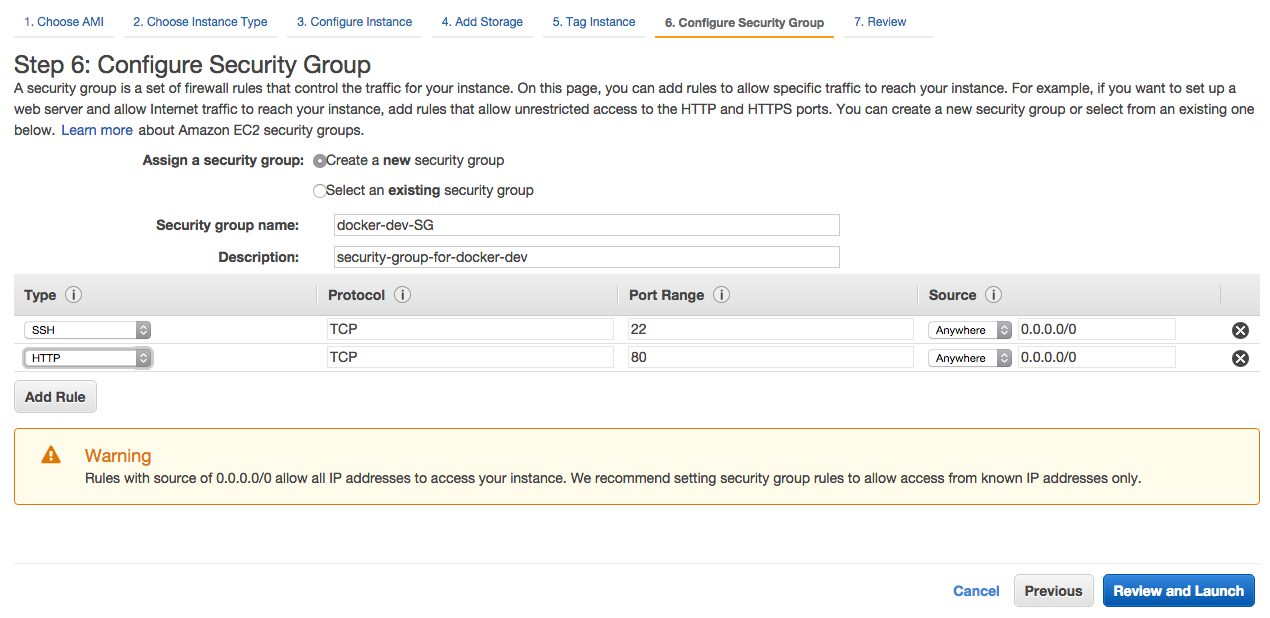
15- Create a new security group, give it a name and also add http below ssh. Click Next. (Here we allow 0.0.0.0/0 for ssh access which is not a good idea in a production environment even though we have ssh key auth enabled.)
16- On the review screen, click launch.
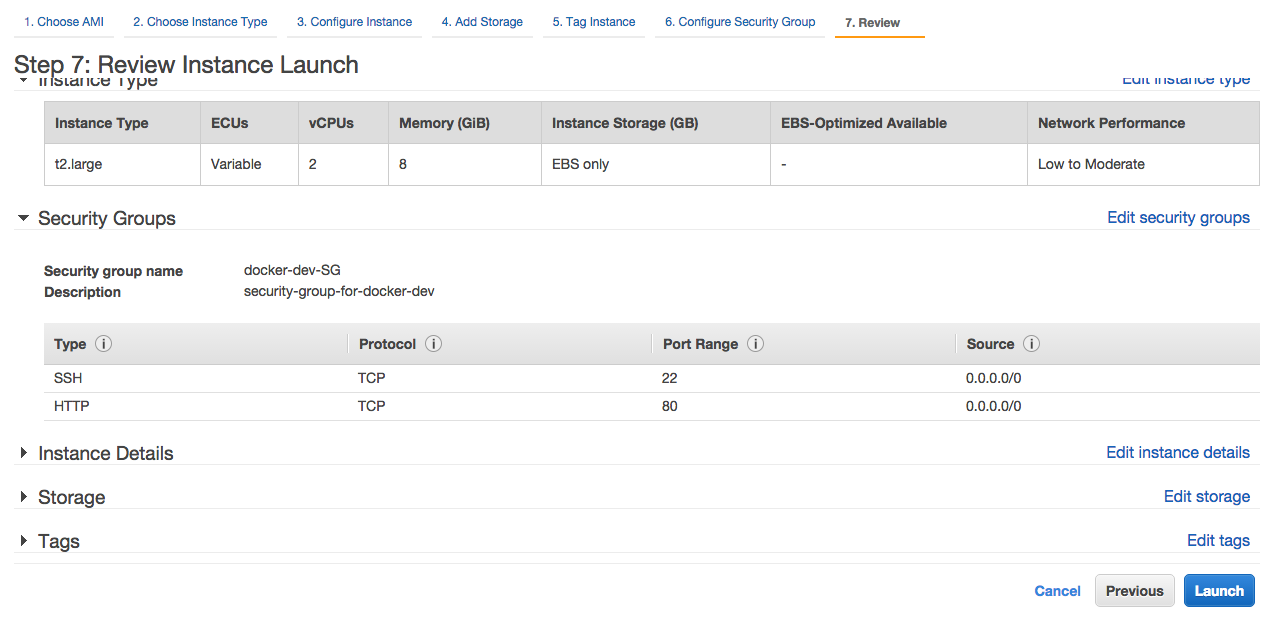
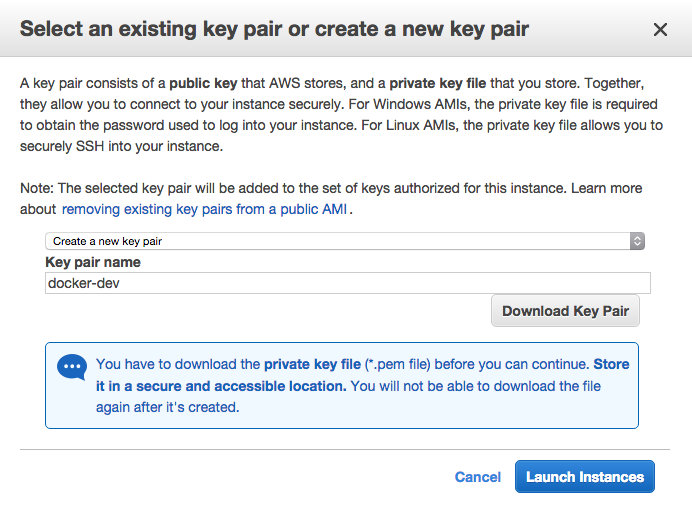
17- The popup will ask for the key pair. Here I choose to create a key specific to this instance. You may do the same, or use an existing one. If you create a new one, after you download it, you will be able to click Launch Instance.
After a few minutes, we will have the new Docker-dev instance.
Verify IAM Role for EC2 Instance
We will check if the role actually works on EC2 instance by logging in and running aws cli.
18- Change key file’s permissions
$ chmod 600 docker-dev.pem
19- Login to EC2 instance. You can find your instance’s DNS name by searching for Docker in EC2 Console.
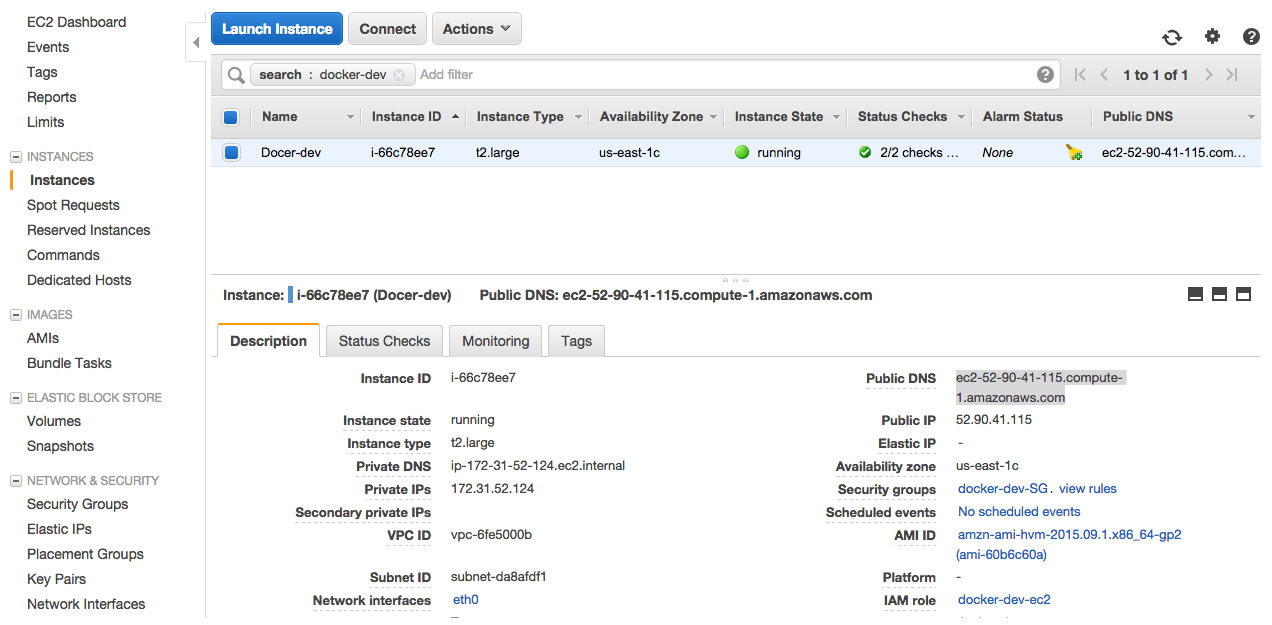
$ ssh ec2-user@ec2-52-90-41-115.compute-1.amazonaws.com -i docker-dev.pem

       __|  __|_  )
       _|  (     /   Amazon Linux AMI
      ___|\___|___|

https://aws.amazon.com/amazon-linux-ami/2015.09-release-notes/
11 package(s) needed for security, out of 27 available
Run "sudo yum update" to apply all updates.
20- Doing the updates is a good idea before movig forward.
[ec2-user@~]$ sudo yum update -Y
...
..
Complete!
21- Let’s check if AWS CLI will be able to return instance status of our new docker instance.
For the command below to run, you need to get the Instance ID of the docker instance from EC2 Console.
[ec2-user@~]$ aws ec2 describe-instance-status --instance-ids i-66c78ee7 --region us-east-1
{
    "InstanceStatuses": [
        {
            "InstanceId": "i-66c78ee7",
            "InstanceState": {
                "Code": 16,
                "Name": "running"
            },
            "AvailabilityZone": "us-east-1c",
            "SystemStatus": {
                "Status": "ok",
                "Details": [
                    {
                        "Status": "passed",
                        "Name": "reachability"
                    }
                ]
            },
            "InstanceStatus": {
                "Status": "ok",
                "Details": [
                    {
                        "Status": "passed",
                        "Name": "reachability"
                    }
                ]
            }
        }
    ]
}
This output proves that Docker-dev EC2 instance has the role assigned properly and is able to call AWS API’s we mentioned in the policy.
Create CodeCommit Repository
Now, as good developers | engineers, we will start keeping everything under a CodeCommit code repository. You can find more about CodeCommit on the product page.
Since we had given CodeCommit rights to the IAM role we assigned to docker instance, we will use AWS CLI for the rest of the document as much as possible.
22- Create a private code repository on CodeCommit.
[ec2-user@~]$ aws codecommit create-repository --repository-name JenkinsDemo --region us-east-1
{
    "repositoryMetadata": {
        "repositoryName": "JenkinsDemo",
        "cloneUrlSsh": "ssh://git-codecommit.us-east-1.amazonaws.com/v1/repos/JenkinsDemo",
        "lastModifiedDate": 1452540179.276,
        "repositoryId": "11b9cd91-a514-4b57-82b7-851f56db560b",
        "cloneUrlHttp": "https://git-codecommit.us-east-1.amazonaws.com/v1/repos/JenkinsDemo",
        "creationDate": 1452540179.276,
        "Arn": "arn:aws:codecommit:us-east-1:<your-aws-account-id>:JenkinsDemo",
        "accountId": "<your-aws-account-id>"
    }
}
23- Install Git Client and Clone Repo
[ec2-user@~]$ sudo yum install git -y
...
..
Complete!
24- Setup Credential Helper
The credential helper will use the default AWS credential profile or the Amazon EC2 instance role. More info is here.
[ec2-user@~]$ mkdir source; cd source
[ec2-user@source]$ git config --global credential.helper '!aws codecommit credential-helper $@'
[ec2-user@source]$ git config --global credential.UseHttpPath true
25- Clone your repo to ~/source folder
[ec2-user@source]$ git clone https://git-codecommit.us-east-1.amazonaws.com/v1/repos/JenkinsDemo
Cloning into 'JenkinsDemo'...
warning: You appear to have cloned an empty repository.
Checking connectivity... done.
26- Configure username and email
[ec2-user@source]$ cd JenkinsDemo
[ec2-user@JenkinsDemo]$ git config --local user.name "Oz Akan"
[ec2-user@JenkinsDemo]$ git config --local user.email oz@cloudway.io
27- Check-in for commit
[ec2-user@JenkinsDemo]$ echo "Notes" > README.md
[ec2-user@JenkinsDemo]$ git add README.md
[ec2-user@JenkinsDemo]$ git commit -m "first commit"
[ec2-user@JenkinsDemo]$ git push origin master
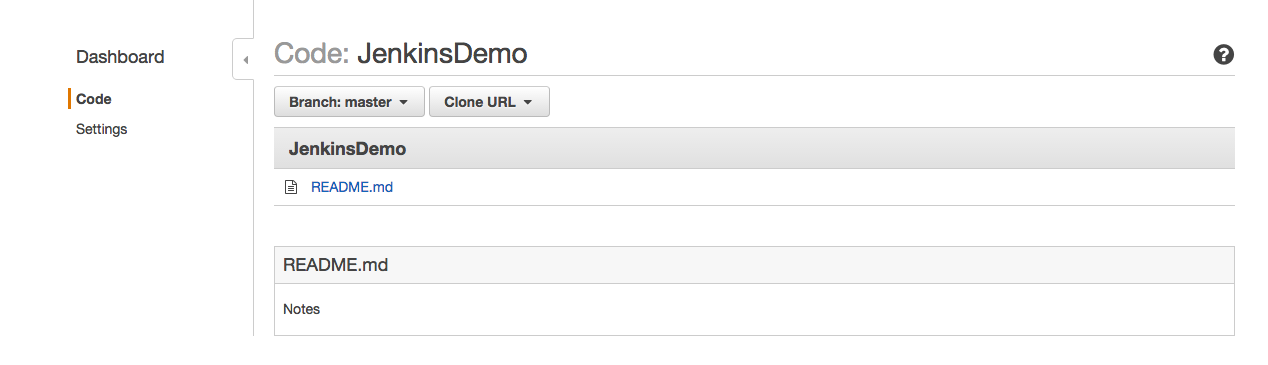
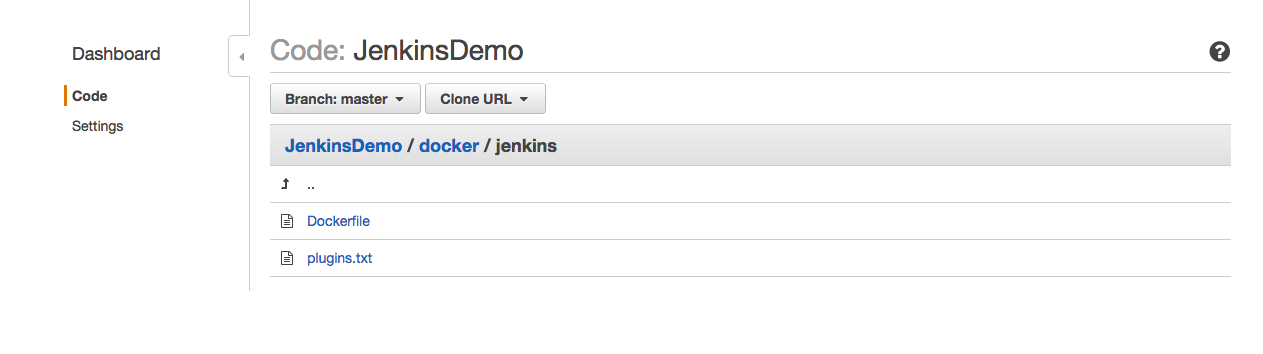
At this point we have a file named README.md locally and also on CodeCommit repository. If you check the repo on CodeCommit Console, you would see the file is listed like below;
Build Jenkins Docker Image
We will have to install docker on the EC2 instance first.
Install Docker
28- Install docker on Amazon Linux.
[ec2-user@JenkinsDemo]$ cd
[ec2-user@~]$ sudo yum install -y docker
...
..
Complete!
29- Start docker service.
[ec2-user@~]$ sudo service docker start
Starting cgconfig service:                                 [  OK  ]
Starting docker:	    .                                  [  OK  ]
[ec2-user@~]$ sudo usermod -a -G docker ec2-user
30- Logout and login again to pick up persmissions.
[ec2-user@~]$ docker info
Containers: 0
Images: 0
Server Version: 1.9.1
Storage Driver: devicemapper
 Pool Name: docker-202:1-263960-pool
 Pool Blocksize: 65.54 kB
 Base Device Size: 107.4 GB
 Backing Filesystem: xfs
 Data file: /dev/loop0
 Metadata file: /dev/loop1
 Data Space Used: 53.74 MB
 Data Space Total: 107.4 GB
 Data Space Available: 83.02 GB
 Metadata Space Used: 606.2 kB
 Metadata Space Total: 2.147 GB
 Metadata Space Available: 2.147 GB
 Udev Sync Supported: true
 Deferred Removal Enabled: false
 Deferred Deletion Enabled: false
 Deferred Deleted Device Count: 0
 Data loop file: /var/lib/docker/devicemapper/devicemapper/data
 Metadata loop file: /var/lib/docker/devicemapper/devicemapper/metadata
 Library Version: 1.02.93-RHEL7 (2015-01-28)
Execution Driver: native-0.2
Logging Driver: json-file
Kernel Version: 4.1.10-17.31.amzn1.x86_64
Operating System: Amazon Linux AMI 2015.09
CPUs: 2
Total Memory: 7.8 GiB
Name: ip-172-31-52-124
ID: R4HZ:QUPA:CIRX:52I5:S5E7:XLPT:DFL6:DC6Y:VLFC:7CPD:GKFY:FBLI
This output verifies we have successfully installed docker.
Create the docker image
We will use official Jenkins docker image to build ours. Offical registry is here.
31- Create the folder structure as seen below and create Dockerfile for jenkins image.
[ec2-user@jenkins]$ pwd
/home/ec2-user/source/JenkinsDemo/docker/jenkins
[ec2-user@jenkins]$ touch Dockerfile
32- Pull jenkins docker image from docker hub.
[ec2-user@jenkins]$ docker pull jenkins
...
..
Status: Downloaded newer image for jenkins:latest
[ec2-user@jenkins]$ docker images
REPOSITORY          TAG                 IMAGE ID            CREATED             VIRTUAL SIZE
jenkins             latest              fc39417bd5fb        3 days ago          708.1 MB
33- Create a named storage container to have persistent data. /var/jenkins_home is the home folder for jenkis in offical jenkins docker image.
[ec2-user@jenkins]$ docker create -v /var/jenkins_home --name jenkins-data-volume jenkins
5c64e21f549bd67df0e076e92059db68753c915ef2f31f519231e2aae01f3177
34- Create Dockerfile to include plugin requirements into our own image.
/home/ec2-user/source/JenkinsDemo/docker/jenkins/Dockerfile looks like this:
FROM jenkins
MAINTAINER Oz Akan <oz@akan.me>

COPY plugins.txt /usr/share/jenkins/plugins.txt
RUN /usr/local/bin/plugins.sh /usr/share/jenkins/plugins.txt
35- Create plugins.txt file with the plugins you want to have installed on jenkins.
/home/ec2-user/source/JenkinsDemo/docker/jenkins/plugins.txt looks like this:
dockerhub:1.0
github-api:1.71
bitbucket:1.1.4
git:2.4.1
ssh-slaves:1.10
36- Build the image. I used cloudwayio/jenkins as identifier, you are free to use anything as long as you will be persistent for the rest of the documentation.
[ec2-user@jenkins]$ docker build -t cloudwayio/jenkins .
Sending build context to Docker daemon 3.072 kB
Step 1 : FROM jenkins
 ---> fc39417bd5fb
Step 2 : MAINTAINER Oz Akan <oz@akan.me>
 ---> Running in e9c52c9f2ed5
 ---> ad6dfd38e072
Removing intermediate container e9c52c9f2ed5
Step 3 : COPY plugins.txt /usr/share/jenkins/plugins.txt
 ---> 1c2382dd21cb
Removing intermediate container bf65d3d8a30b
Step 4 : RUN /usr/local/bin/plugins.sh /usr/share/jenkins/plugins.txt
 ---> Running in d15a15f85df6
Downloading dockerhub:1.0
Downloading github-api:1.71
Downloading bitbucket:1.1.4
Downloading git:2.4.1
Downloading ssh-slaves:1.10
 ---> 7c83e18fb01a
Removing intermediate container d15a15f85df6
Successfully built 7c83e18fb01a
When you check images, you will see cloudwayio/jenkins image there.
[ec2-user@jenkins]$ docker images
REPOSITORY           TAG                 IMAGE ID            CREATED             VIRTUAL SIZE
cloudwayio/jenkins   latest              7c83e18fb01a        11 seconds ago      711.6 MB
jenkins              latest              fc39417bd5fb        3 days ago          708.1 MB
37- At this point we have a storage container and a jenkins image. Let’s start our jenkins container. With -p 80:8080 we are binding host’s port 80 to containers port 8080.
[ec2-user@jenkins]$ docker run -d -p 80:8080 --volumes-from jenkins-data-volume \
--name ecs-jenkins cloudwayio/jenkins
5558be3aa92ffe16644f51794915b559e532ccf73b6a74455daafeb7ec2c1556
We can check the running containers
[ec2-user@jenkins]$ docker ps -a
CONTAINER ID        IMAGE                COMMAND                  CREATED             STATUS              PORTS                             NAMES
5558be3aa92f        cloudwayio/jenkins   "/bin/tini -- /usr/lo"   38 seconds ago      Up 38 seconds       50000/tcp, 0.0.0.0:80->8080/tcp   ecs-jenkins
5c64e21f549b        jenkins              "/bin/tini -- /usr/lo"   20 minutes ago      Created                                               jenkins-data-volume
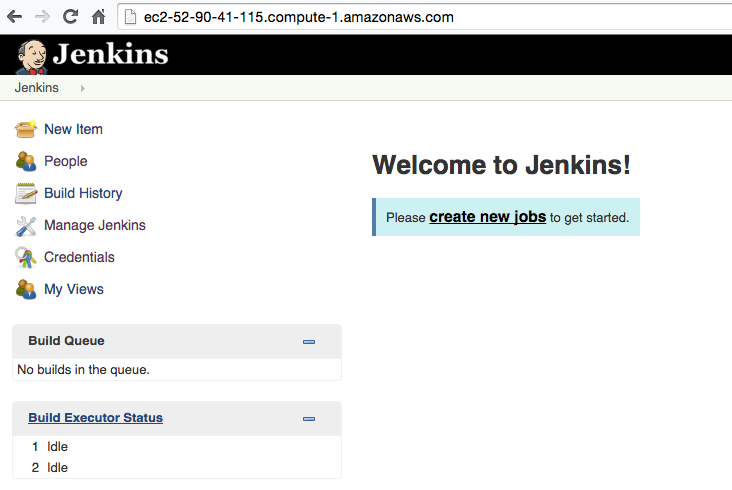
Also if we go to the DNS name of the docker EC2 instance, we will see Jenkins running on port 80
Checkin the code to CodeCommit Repository
38- At this point we have Dockerfile and plugins.txt files; we may want to change these in time or if nothing, we would like to keep a copy. So let’s check them in to CodeCommit repository we created earlier.
[ec2-user@JenkinsDemo]$ pwd
/home/ec2-user/source/JenkinsDemo
[ec2-user@JenkinsDemo]$ git add -A
[ec2-user@JenkinsDemo]$ git commit -m "docker configuration"
[master 396447d] docker configuration
 2 files changed, 10 insertions(+)
 create mode 100644 docker/jenkins/Dockerfile
 create mode 100644 docker/jenkins/plugins.txt
[ec2-user@JenkinsDemo]$ git push origin master
Counting objects: 6, done.
Delta compression using up to 2 threads.
Compressing objects: 100% (5/5), done.
Writing objects: 100% (6/6), 575 bytes | 0 bytes/s, done.
Total 6 (delta 0), reused 0 (delta 0)
remote:
To https://git-codecommit.us-east-1.amazonaws.com/v1/repos/JenkinsDemo
   f084118..396447d  master -> master
Out of curiosity, we can check if files are really synced by checking CodeCommit console.
At this point we are ready to start working on ECS.
Create A (Private) ECS Container Registry
In AWS terms, docker registry is called repository. You can find more information about Amazon EC2 Container Registry on the product page.
39- We will create a repository to keep our jenkins docker image.
[ec2-user@JenkinsDemo]$ aws ecr create-repository \
--repository-name jenkins-demo --region us-east-1
{
    "repository": {
        "registryId": "<your-aws-account-id>",
        "repositoryName": "jenkins-demo",
        "repositoryArn": "arn:aws:ecr:us-east-1:<your-aws-account-id>:repository/jenkins-demo"
    }
}
PS: if you get an error, it might be because of the version of aws-cli installed on the EC2 instance. As of this writing aws-cli/1.9.17 has support for ECR. pip install --upgrade awscli would do the trick.
We are almost ready to upload our docker image.
40- We need to authenticate docker to ECR regisry with get-login
[ec2-user@JenkinsDemo]$ aws ecr get-login --region us-east-1
docker login -u AWS -p CiBwm0YaISJeRtJm5n1G6uqeekXuoXXPe5UFce9Rq8/14xLaCAEBAgB4cJtGGiEiXkbSZuZ9RurqnnpF7qF1z3uVBXHvUavP9eMAAAQxMIIELQYJKoZIhvcNAQcGoIIEHjCCBBoCAQAwggQTBgkqhkiG9w0BBwEwHgYJYIZIAWUDBAEuMBEEDEKL0liBiC0OfkkNDQIBEICCA+QF1SyY3tNhgE3gNDCniIMnF/EvNFoQi/SgtOsDtcf5wRK9NgOTc3GrxRLnK19vxsFa92VFbyiWylEnGDlkNJWLwJrt5KENgApZFIiejAF6jxqa0Rp8mF7DD78w4utt9ydTn2uIGqMrm9sw4Ig3NAg20c3jmSt3Bmy2cOOPQk0IPrE3lQlxwKAhZV2tBWWAhTT1cxnlOMGrLHiqFtTF8vhIWsMx9vNi9lCgeiMUvkeD89LBu8mxVCTkMm97RHT+vEgykJuls/40sjfiV/yewUvztXpyaKx8JayCgBOVR7iTHviOZW7eK85AQXDm26Isx64+ypp6zs+6Ub7xV3AXvjtSnygm/mrWq7EJ+ZkKqycw9Dp7N1733ZMf7BB530qUQiDahK5RQYbebeEHu2ZjitacpoyyyMRaYLriZXez8ZnpEUVgfcgzLr/OuLeQYE9T9EgiqNTFJ9oiVondbpxv4PKTpzOl5ZuHW53t4Nn7t+rMU2V2wvfbgaCsFYWTF3F11IfziF0SmB1TYESBrmgjeiacKC+XnzSdEIXKFI8IqqHxI0u8QLxZAuYKXdw4R+El7513RaoSAHwU2FO4uzemCkBcBEO3zNPKEsTT0Vui4iSpvSmO3UWB2nhOJaZTBnxYL26Sz4wwuqDUVrmntJ5LyTDqFswaCTBh55j0noIOItK0ha1l9h22zfAdiDS1ub2QMADiTZU7KpZQdUKop5xsZpaVZUZSu7Kf7+pCkA381McMMxzU5kJgGxbArEsUdyBwyipbz5LsDjmB88Y6AHT8NBPGjoR6DbGAuZ4lgAscxb0xGojfXN1Y2ztmByQkEj5uAyiRKAbaAhv++rKO9v6m7OKVNmEr1y0bfNrRbwp+khle8oo6sWr7Ns+gCgc1+CaFjC//Z8Ui2q+N+s82vVJshtGMhmj4VCNnhuMh0+1lAceMumW0hMwWfMnbnm8X7LU4PSSHnglBcIx8jcPUgj0cbNOvozy3TqZc8WEH7tVl6jcx15FaKNuH7aNRnwMlp6KuSuAdDRHjSSOyQazmWRBzHB4flu0zeUWAYiBfyl5x28UPkMYzX3IonH6F4R13eVP3cO3i3gteVfRNfKpi4PXVFgxx5XhJdmX7/bclXjhRok/UMLzlvDuO0pHauo+VHH0HYDCqibtxWRklRGx45+OJWw92nIp4q/QTt9p+sxS8QTpKtXpcK2K50M/77UVpj3mW7hhfvxMfS6Cqq7crce5UmQbcSDY+fvoIrn+jul9RPa8iPgZGHOII8yo6+yPtdNkUoDp7EHVA4cnmmzKa0T1nSwKQbHQvvBbRy7Rl22yUFbwi2MXIhnA= -e none https://<your-aws-account-id>.dkr.ecr.us-east-1.amazonaws.com
Run run the output above.
Now, docker can push/pull images to ECR registry.
41- If you still have jenkins container running, let’s stop it now.
[ec2-user@JenkinsDemo]$ docker ps -a
CONTAINER ID        IMAGE                COMMAND                  CREATED             STATUS              PORTS                             NAMES
5558be3aa92f        cloudwayio/jenkins   "/bin/tini -- /usr/lo"   15 hours ago        Up 15 hours         50000/tcp, 0.0.0.0:80->8080/tcp   ecs-jenkins
5c64e21f549b        jenkins              "/bin/tini -- /usr/lo"   15 hours ago        Created                                               jenkins-data-volume
[ec2-user@JenkinsDemo]$ docker stop ecs-jenkins
ecs-jenkin
Finally it’s time to tag and upload the Jenkins docker image we created. We won’t be using the data volume image on ECS.
42- Tag the image; use your account id and region information accordingly while doing so.
[ec2-user@JenkinsDemo]$ docker tag cloudwayio/jenkins:latest \
<your-aws-account-id>.dkr.ecr.us-east-1.amazonaws.com/jenkins-demo:latest
Let’s check tagged image.
[ec2-user@JenkinsDemo]$ docker images
REPOSITORY                                                  TAG                 IMAGE ID            CREATED             VIRTUAL SIZE
cloudwayio/jenkins                                          latest              7c83e18fb01a        15 hours ago        711.6 MB
<your-aws-account-id>.dkr.ecr.us-east-1.amazonaws.com/jenkins-demo   latest              7c83e18fb01a        15 hours ago        711.6 MB
jenkins                                                     latest              fc39417bd5fb        3 days ago          708.1 MB
43- Upload the image to ECR Registry
[ec2-user@JenkinsDemo]$ docker push <your-aws-account-id>.dkr.ecr.us-east-1.amazonaws.com/jenkins-demo:latest
This command will take a while to upload the image depending on the image size and the bandwidth of the instance/server you are running the command on. Meanwhile it is good to remind some limits of ECR; as of January 2016, you can have 1000 repositories per account and each repository can have 500 images. (reference)
Once upload is completed, you will see latest digest.
The push refers to a repository [<your-aws-account-id>.dkr.ecr.us-east-1.amazonaws.com/jenkins-demo] (len: 1)
7c83e18fb01a: Pushed
1c2382dd21cb: Pushed
ad6dfd38e072: Pushed
...
...
5c63804eac90: Pushed
523ef1d23f22: Pushed
latest: digest: sha256:b804fb1078bbaaaadf255b29dcf625ce59fa60d915f289b75b5cbb115a1dbb45 size: 81657
44- As usual, let’s check the image
[ec2-user@JenkinsDemo]$ aws ecr list-images --repository-name jenkins-demo --region us-east-1
//output
{
    "imageIds": [
        {
            "imageTag": "latest",
            "imageDigest": "sha256:b804fb1078bbaaaadf255b29dcf625ce59fa60d915f289b75b5cbb115a1dbb45"
        }
    ]
}
Create ECS (Amazon EC2 Container Service) Cluster
45- We will create a cluster named JenkinsDemoCluster in us-east-1 region.
[ec2-user@JenkinsDemo]$ aws ecs create-cluster --cluster-name JenkinsDemoCluster --region us-east-1
//output
{
    "cluster": {
        "status": "ACTIVE",
        "clusterName": "JenkinsDemoCluster",
        "registeredContainerInstancesCount": 0,
        "pendingTasksCount": 0,
        "runningTasksCount": 0,
        "activeServicesCount": 0,
        "clusterArn": "arn:aws:ecs:us-east-1:<your-aws-account-id>:cluster/JenkinsDemoCluster"
    }
}
We must have an ECS container instance in our cluster before we can run tasks on it. We will choose amazon-ecs-optimized AMI (ami-6ff4bd05 for us-east-1) so it will come with Amazon ECS Container Agent. If you choose a different image you will have to manually install the agent on EC2 instance.
If you want to, you can return all ECS optimized images for us-east-1 with the command below:
$ aws ec2 describe-images --filters "Name=description,Values=*ECS*" --region us-east-1
At the moment we have no container instances running in ECS.
[ec2-user@JenkinsDemo]$  aws ecs list-container-instances --cluster JenkinsDemoCluster --region us-east-1
//outputs
{
    "containerInstanceArns": []
}
So we will create an instance using an ebs-optimized-ami. We will choose the security group we created for our Docker-dev instance. We will choose m4.large; you are free to choose any size just good to have some storage and memory. We will use docker-dev-ec2 instance profile name which is created automatically by console when we created the role with the same name.
46- Create a file named user-data.txt with the content below
#!/bin/bash
echo ECS_CLUSTER=JenkinsDemoCluster >> /etc/ecs/ecs.config
47- We need to find the original block device mapping of ami-6ff4bd05 which is amazon-ecs-optimized.
[ec2-user@JenkinsDemo]$ ec2-describe-images ami-6ff4bd05
IMAGE   ami-6ff4bd05    591542846629/amzn-ami-2015.09.c-amazon-ecs-optimized    591542846629    available       public          x86_64  machine                         ebs /dev/xvda        hvm     xen
BLOCKDEVICEMAPPING      EBS     /dev/xvda               snap-d6395b9b   30      true    gp2             Not Encrypted
48- We will use the values from the output of the command above, except we will change 30 to 80 which indicates the size of volume.
[ec2-user@JenkinsDemo]$ aws ec2 run-instances \
--image-id ami-6ff4bd05 --count 1 \
--instance-type m4.large --key-name docker-dev \
--security-groups  docker-dev-SG --region us-east-1 \
--user-data file://user-data.txt --iam-instance-profile "Name=docker-dev-ec2" \
--block-device-mappings "[{\"DeviceName\":\"/dev/xvda\",\"Ebs\":{\"VolumeSize\":80,\"DeleteOnTermination\":false}}]"
//output
{
    "OwnerId": "<your-aws-account-id>",
    "ReservationId": "r-bfa21b41",
    "Groups": [],
    ...
    ...
        "IamInstanceProfile": {
            "Id": "AIPAJC5TI5ALUAHFYSXPW",
            "Arn": "arn:aws:iam::<your-aws-account-id>:instance-profile/docker-dev-ec2"
        },
        "RootDeviceName": "/dev/xvda",
        "VirtualizationType": "hvm",
        "AmiLaunchIndex": 0
    }
}
49- Lets check running instances again.
[ec2-user@~]$ aws ecs list-container-instances --cluster JenkinsDemoCluster --region us-east-1
//output
{
    "containerInstanceArns": [
        "arn:aws:ecs:us-east-1:<your-aws-account-id>:container-instance/de47f2db-811c-49be-b69d-eab448dfcbdc"
    ]
}
50- Above de47f2db-811c-49be-b69d-eab448dfcbdc is the instance id and we can use it to get more details about the instance as seen below:
[ec2-user@~]$ aws ecs describe-container-instances --cluster JenkinsDemoCluster \
--region us-east-1 --container-instances de47f2db-811c-49be-b69d-eab448dfcbdc
//output
{
    "failures": [],
    "containerInstances": [
        {
            "status": "ACTIVE",
            "registeredResources": [
                {
                    "integerValue": 2048,
                    "longValue": 0,
                    "type": "INTEGER",
                    "name": "CPU",
                    "doubleValue": 0.0
                },
                ...
                ...
            "versionInfo": {
                "agentVersion": "1.7.0",
                "agentHash": "191dbd5",
                "dockerVersion": "DockerVersion: 1.7.1"
            }
        }
    ]
}
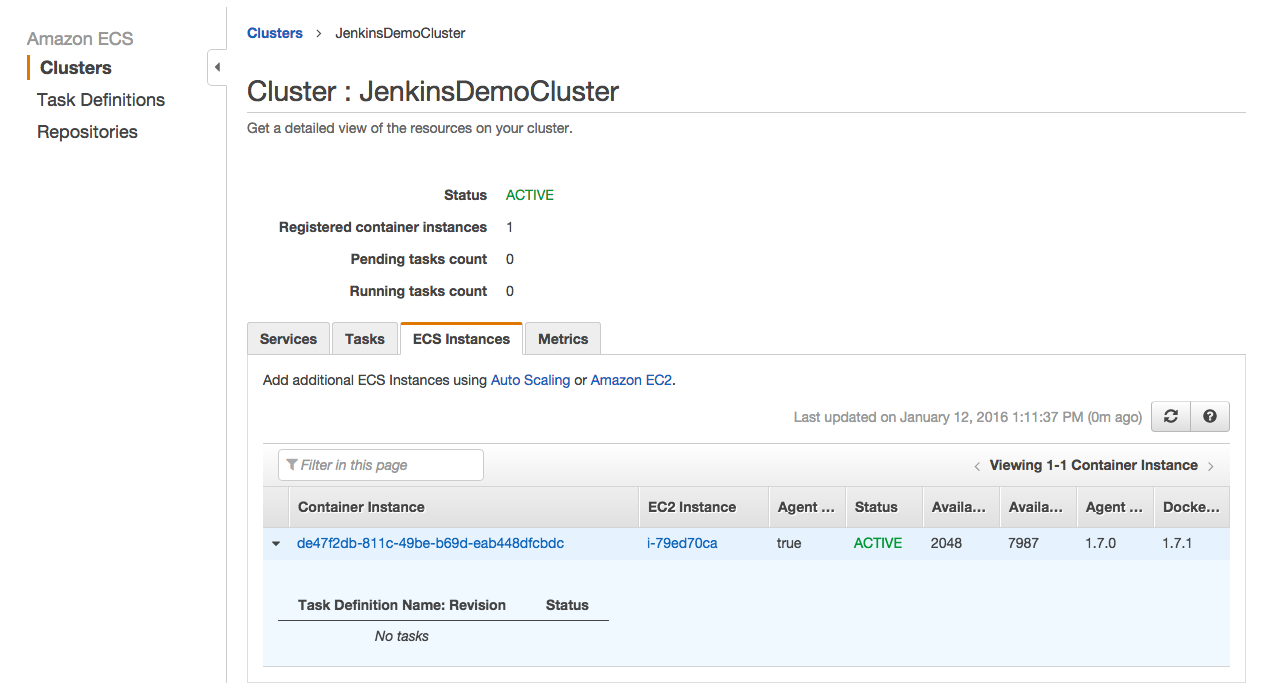
The output is pretty long so didn’t put all above. You can find running tasks, docker version, EC2 instance id there.
On the ECS Console our instance is displayed as seen below:
Run Jenkins Container on ECS
Docker has the concept of data volume containers as we’ve created one earlier.
Data volume containers, map a volume from the host and reference to it as long as data volume container is not removed. The trick is, you can reference this data volume container from other containers using --volumes-from. In this case you can share the same volume with multiple containers; you can delete all these containers but as long as you don’t remove the data volume container, your data will persist. Since data volume container is there just to reference a volume from host, it doesn’t even have to be running.
ECS has a way of creating a hidden data volume container instance. Data volume container will have an image named amazon/ecs-emptyvolume-base. It will be automatically created as soon as you create a service with an empty volume. It won’t be running. You can login to ECS instance check it out.
Here are the docker images on ECS host:
[ec2-user@ip-172-31-30-233 ~]$ docker images
REPOSITORY                                                       TAG                 IMAGE ID            CREATED             VIRTUAL SIZE
amazon/ecs-emptyvolume-base                                      autogenerated       22dd0110832b        17 hours ago        0 B
<your-aws-account-id>.dkr.ecr.us-east-1.amazonaws.com/jenkins-demo        latest              7c83e18fb01a        39 hours ago        711.6 MB
Here are the running containers on ECS host (notice no container for the data volume running):
[ec2-user@ip-172-31-30-233 ~]$ docker ps
CONTAINER ID        IMAGE                                                              COMMAND                CREATED             STATUS              PORTS                                            NAMES
3df37ad47b94        <your-aws-account-id>.dkr.ecr.us-east-1.amazonaws.com/jenkins-demo:latest   "/bin/tini -- /usr/l   20 minutes ago      Up 20 minutes       0.0.0.0:50000->50000/tcp, 0.0.0.0:80->8080/tcp   ecs-j3-task-5-j3-container-92e3b3eff5ebedf6ba01
b8a36e56a15d        amazon/amazon-ecs-agen
We can also see what volumes ecs-emptyvolume-base has:
[ec2-user@ip-172-31-30-233 ~]$ docker inspect -f {{.Volumes}} d9e122a1caa7
map[/ecs-empty-volume/host_blank:/var/lib/docker/volumes/c9d152c5ddcdd31f4d21212a71738293db1761debab37d5820c454936ecd26e4/_data]
It is good that ECS will create a data container instance behind the scenes but since this container is fully managed, it’s volumes will be removed when service stops. This means data will be not persistent. There might be a use case for this but in our demo for jenkins we want to have persistent data.
Another important note; data will be under the root volume of the ECS host and if we terminate ECS host, it will be gone. Not much ECS can do about it. It would be a good practice to set DeleteOnTermination to false or use another EBS volume to keep persistent data. We could also mount this EBS volume to another host or clone. We can also use S3 to backup data we have in the data volume.
Ok enough reading, let use AWS CLI to run jenkins in a container on ECS.
We already created an ECS cluster named JenkinsDemoCluster. Now, we will register a task definition to run on JenkinsDemoCluster.
51- You can either create a file named task-demo.json with the following AWS CLI command and modify the content.
[ec2-user@JenkinsDemo]$ aws ecs register-task-definition --generate-cli-skeleton > task-demo.json
Or you can just copy & paste the configuration below into task-demo.json. Remember to replace <your-aws-account-id> with your account id.
{
    "family": "jenkins-demo-task",
    "containerDefinitions": [
        {
            "name": "jenkins-demo-container",
            "image": "<your-aws-account-id>.dkr.ecr.us-east-1.amazonaws.com/jenkins-demo:latest",
            "cpu": 512,
            "memory": 2048,
            "portMappings": [
                {
                    "containerPort": 8080,
                    "hostPort": 80,
                    "protocol": "tcp"
                },
                {
                    "containerPort": 50000,
                    "hostPort": 50000,
                    "protocol": "tcp"
                }
            ],
            "essential": true,
            "mountPoints": [
                {
                    "sourceVolume": "jenkins_home",
                    "containerPath": "/var/jenkins_home",
                    "readOnly": false
                }
            ],
            "privileged": false,
            "user": "root",
            "readonlyRootFilesystem": false
        }
    ],
    "volumes": [
        {
            "name": "jenkins_home",
            "host": {
                "sourcePath": "/ecs/volumes/jenkins_home"
            }
        }
    ]
}
52- Register the task definition
$ aws ecs register-task-definition --cli-input-json \
file://$HOME/source/JenkinsDemo/task-demo.json --region us-east-1
CLI will return a JSON output with a revision number 1.
"revision": 1
Revision is important as we will use it with task family name (jenkins-demo-task:1) to define a task we will use under the service we will define.
53- We can query task definitions to see the one we just created.
[ec2-user@JenkinsDemo]$ aws ecs list-task-definitions --region us-east-1
//output
{
    "taskDefinitionArns": [
        "arn:aws:ecs:us-east-1:<your-aws-account-id>:task-definition/jenkins-demo-task:1"
    ]
}
54- Create a service definition using jenkins-demo-task
We want to create a ECS service which will allow us to run and maintain a specified number of task definitions on a cluster. Since we want one jenkins instance to be up and running all the time, ECS service will ensure that a container is up and if it crashes, it will create another instance.
You can again use the command below to create a template file named service-demo.json and modify it later on.
[ec2-user@JenkinsDemo]$ aws ecs create-service --generate-cli-skeleton > service-demo.json
Or, you can copy past the JSON content below into service-demo.json
{
    "cluster": "JenkinsDemoCluster",
    "serviceName": "jenkins-service",
    "taskDefinition": "jenkins-demo-task:1",
    "desiredCount": 1,
    "clientToken": "random_value_here",
    "deploymentConfiguration": {
        "maximumPercent": 200,
        "minimumHealthyPercent": 50
    }
}
55- Create service.
[ec2-user@JenkinsDemo]$ aws ecs create-service --cli-input-json \
file://$HOME/source/JenkinsDemo/service-demo.json --region us-east-1
//output
{
    "service": {
        "status": "ACTIVE",
        "taskDefinition": "arn:aws:ecs:us-east-1:<your-aws-account-id>:task-definition/jenkins-demo-task:1",
        "pendingCount": 0,
        "loadBalancers": [],
        "desiredCount": 1,
        "serviceName": "jenkins-service",
        "clusterArn": "arn:aws:ecs:us-east-1:<your-aws-account-id>:cluster/JenkinsDemoCluster",
        "serviceArn": "arn:aws:ecs:us-east-1:<your-aws-account-id>:service/jenkins-service",
        "deploymentConfiguration": {
            "maximumPercent": 200,
            "minimumHealthyPercent": 50
        },
        "deployments": [
            {
                "status": "PRIMARY",
                "pendingCount": 0,
                "createdAt": 1452707724.255,
                "desiredCount": 1,
                "taskDefinition": "arn:aws:ecs:us-east-1:<your-aws-account-id>:task-definition/jenkins-demo-task:1",
                "updatedAt": 1452707724.255,
                "id": "ecs-svc/9223370584147051552",
                "runningCount": 0
            }
        ],
        "events": [],
        "runningCount": 0
    }
}
If you have another task running on your cluster mapped to port 80 on the host, you may get the following error:
service jenkins-service was unable to place a task because no container
instance met all of its requirements. The closest matching container-instance
de47f2db-811c-49be-b69d-eab448dfcbdc is already using a port required by your task.
For more information, see the Troubleshooting section.
This is expected as only one application can allocate a port on the host. In this case you will have to change the port Jenkins container will listen.
As soon as service is created with desiredCount set to 1, it will start the container that we defined in the task.
56- Check the running tasks.
[ec2-user@JenkinsDemo]$ aws ecs list-tasks --cluster JenkinsDemoCluster \
--region us-east-1
//output
{
    "taskArns": [
        "arn:aws:ecs:us-east-1:<your-aws-account-id>:task/946137b2-6899-46a0-a232-ebf89fa55474"
    ]
}
57- Just the id of the task wasn’t very helpful so let’s describe this task.
[ec2-user@JenkinsDemo]$ aws ecs describe-tasks --cluster JenkinsDemoCluster \
--task 946137b2-6899-46a0-a232-ebf89fa55474 --region us-east-1
//output
{
    "failures": [],
    "tasks": [
        {
            "taskArn": "arn:aws:ecs:us-east-1:<your-aws-account-id>:task/946137b2-6899-46a0-a232-ebf89fa55474",
            "overrides": {
                "containerOverrides": [
                    {
                        "name": "jenkins-demo-container"
                    }
                ]
            },
            "lastStatus": "RUNNING",
            "containerInstanceArn": "arn:aws:ecs:us-east-1:<your-aws-account-id>:container-instance/de47f2db-811c-49be-b69d-eab448dfcbdc",
            "createdAt": 1452711040.511,
            "clusterArn": "arn:aws:ecs:us-east-1:<your-aws-account-id>:cluster/JenkinsDemoCluster",
            "startedAt": 1452711042.28,
            "desiredStatus": "RUNNING",
            "taskDefinitionArn": "arn:aws:ecs:us-east-1:<your-aws-account-id>:task-definition/jenkins-demo-task:1",
            "startedBy": "ecs-svc/9223370584144225434",
            "containers": [
                {
                    "containerArn": "arn:aws:ecs:us-east-1:<your-aws-account-id>:container/2e4d0e8f-e96d-4abe-b1da-1fe3145cfb2c",
                    "taskArn": "arn:aws:ecs:us-east-1:<your-aws-account-id>:task/946137b2-6899-46a0-a232-ebf89fa55474",
                    "lastStatus": "RUNNING",
                    "name": "jenkins-demo-container",
                    "networkBindings": [
                        {
                            "protocol": "tcp",
                            "bindIP": "0.0.0.0",
                            "containerPort": 50000,
                            "hostPort": 50000
                        },
                        {
                            "protocol": "tcp",
                            "bindIP": "0.0.0.0",
                            "containerPort": 8080,
                            "hostPort": 80
                        }
                    ]
                }
            ]
        }
    ]
}
Looking at taskDefinitionArn you can see this task belongs to jenkins-demo-task family and is version 1.
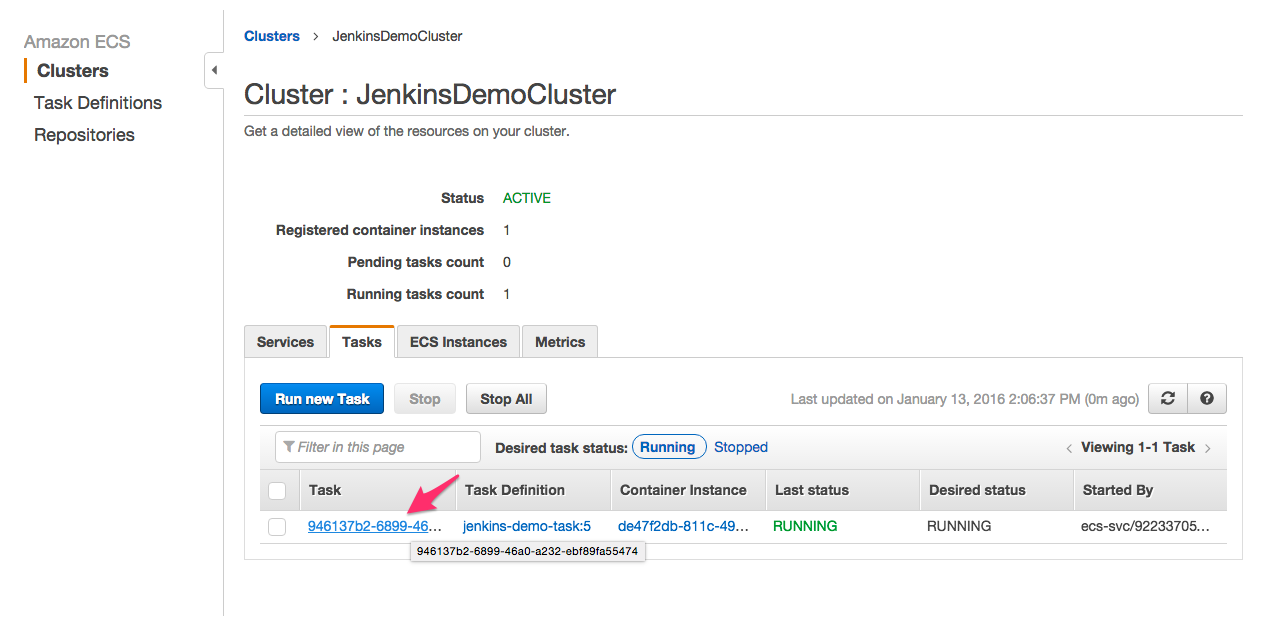
Let’s find out if jenkins is really running.
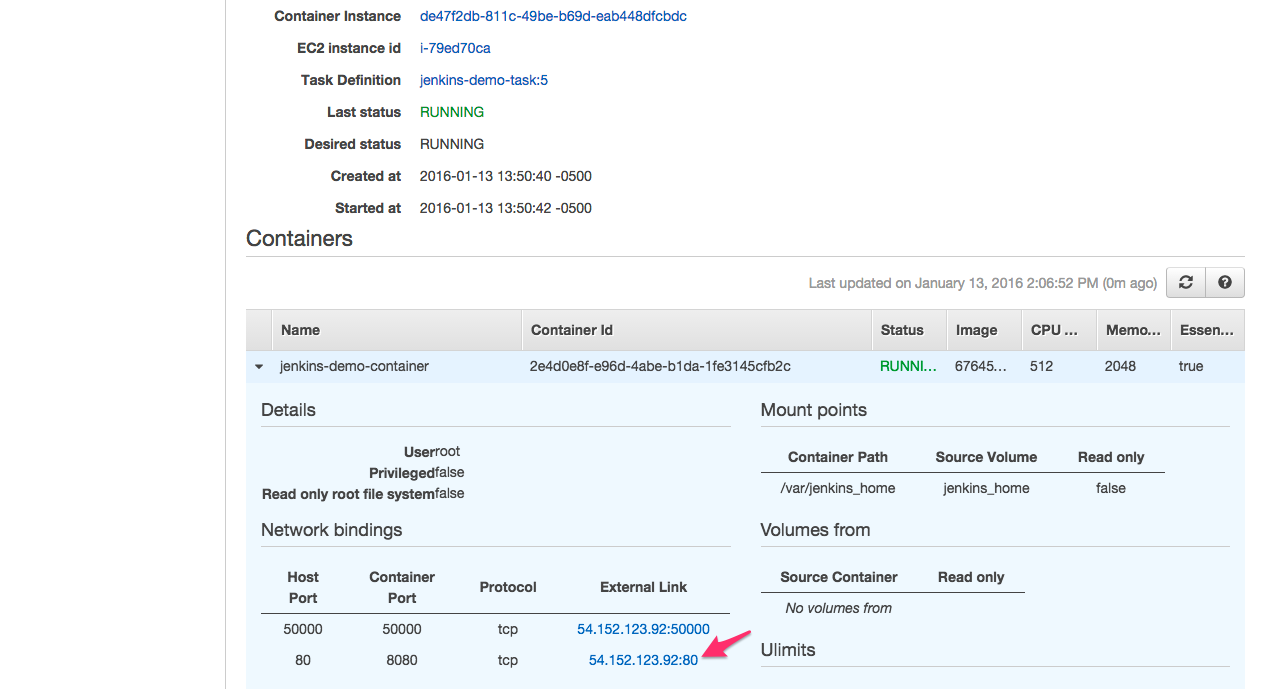
58- Go to ECS Console and click JenkinsDemoCluster and click to the task id (pointed with the arrow).
59- Click the IP:PORT (pointed by the arrow).
This IP address belongs to the ECS instance (host) and there can be only one container mapped to port 80 on the host. An ELB would overcome this limitation if we want to run multiple internet facing services on the same ECS instance.
60- You should see jenkins welcome screen.

Don’t forget to enable security under
Configure Global Securitysettings right away!
Final Notes
In this article, we created an EC2 instance as a development box with an EC2 role that can use various AWS products. We installed docker on this instance and created a Jenkins Docker image. We added the plugins we wanted to Jenkins. Then we created an ECS cluster, a task and a service to ensure task is always running. Finally we were able to see Jenkins web interface.
At this point, deploying new versions of Jenkins on EC2 Container Service is pretty easy. We can create new revisions of our tasks and let ECS deploy it.
- In production, you would like to have SSL Encryption, so maybe an nginx container infront of jenkins or probably an Elastic Load Balancer with SSL.
- You also wouldn’t like to assign an EC2 Role to ECS instances with broad access rights, like the one we assigned to
Docker-devinstance.
You might also wonder how much of the code we ran above could be automated using CloudFormation.
Let’s make minor changes to secure this environment for production and automate even further in a following post.
Finally, don’t forget to push new files and changes into CodeCommit.
[ec2-user@JenkinsDemo]$ git add -A; git commit -m "ecs demo files"; git push origin master
I wish you a very productive day.
May the force (of automation) with you…